Coping with Couplers
Couplers keep our trains together; without 'em, we'd all be using Brio magnets. But the couplers we use in Z scale are tiny, potentially-troublesome, sometimes confusing, and often infuriating mechanisms.
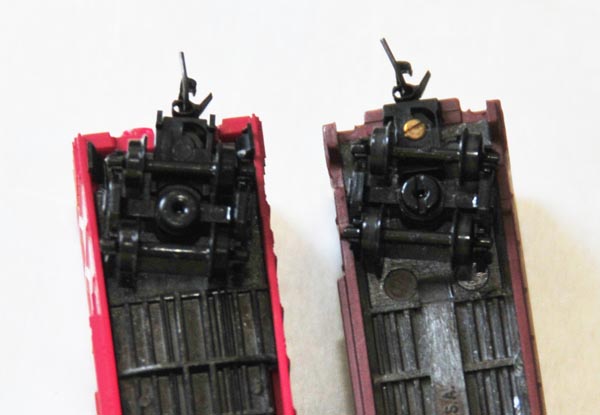
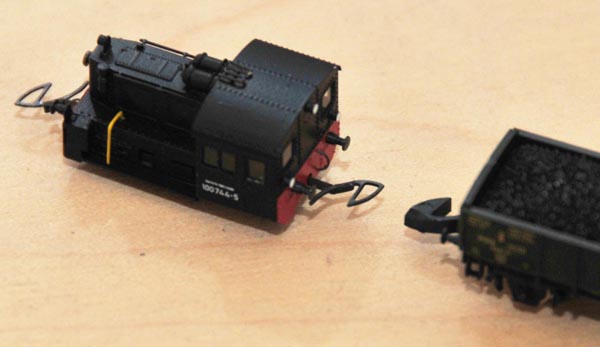
 For years, there were only two types of couplers available on Z-scale locomotives and rolling stock: Marklin "fishhook" couplers and Micro-Trains Line "knuckle" couplers.
Marklin couplers, shown left, were introduced with Z scale in 1972 and are standard on most Marklin products.
Micro-Trains (Kadee, a.k.a. MTL) couplers, shown right, come with all Micro-Trains locomotives and rolling stock (and, until recently, engines and cars from many other Z-scale manufacturers).
These two coupler types are completely incompatible.
For years, there were only two types of couplers available on Z-scale locomotives and rolling stock: Marklin "fishhook" couplers and Micro-Trains Line "knuckle" couplers.
Marklin couplers, shown left, were introduced with Z scale in 1972 and are standard on most Marklin products.
Micro-Trains (Kadee, a.k.a. MTL) couplers, shown right, come with all Micro-Trains locomotives and rolling stock (and, until recently, engines and cars from many other Z-scale manufacturers).
These two coupler types are completely incompatible.
Then, in 2008, something funny happened: Micro-Trains stopped allowing other manufacturers to sell rolling stock and locomotives with Micro-Trains couplers and trucks. This, of course, was bad news for these smaller brands, who now had to choose between shipping their products without couplers and wheels, or (quickly) developing their own. So, develop their own is what they did: both American Z Lines and Uncle Will's Full Throttle introduced their own proprietary couplers and trucks. This kept their rolling stock moving, but also ended up adding further confusion and frustration to a market where two standards were already too many.
But differing standards is only part of the story.
Whichever couplers you use (and need not limit yourself to just one type), you'll also need to contend with automatic coupling, remote uncoupling, conversions, and repairs.
This article should help you sort it all out.
In this article:
Feel free to write me if you have any additions or corrections to this page. Click on any photo to see more detail.
Coupler Types
Here's a run-down of the different couplers you'll encounter on Z-scale rolling stock:
Marklin "fishhook" couplers
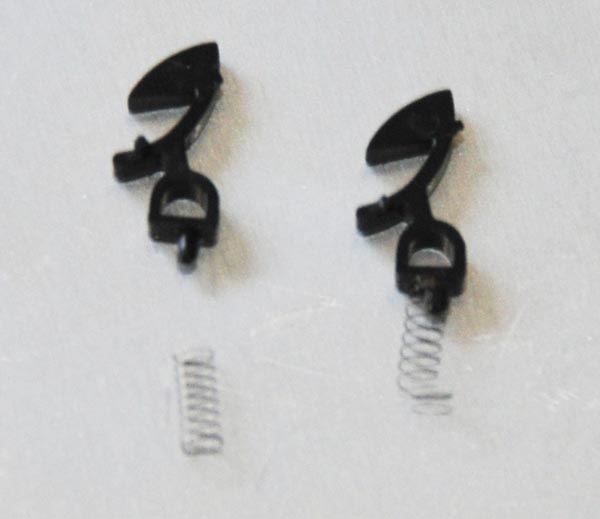
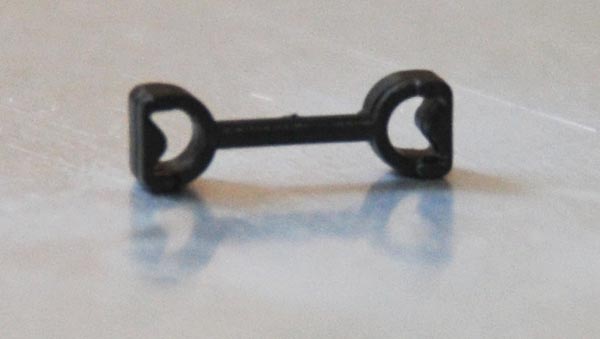
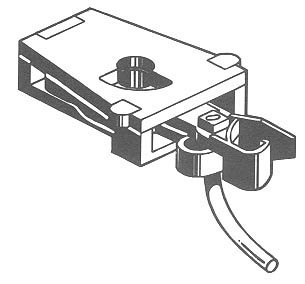
Marklin fishhook couplers are larger, and therefore more sturdy and forgiving than their MTL counterparts. While MTL couplers are comprised of six parts, Marklin couplers are only made of two pieces: the single piece hook, and the spring (actually, it's three if you count the pin/enclosure integrated into the rolling stock). Marklin couplers need no adjustments, and require virtually no maintenance. I have Marklin rolling stock that is over 30 years old, and their original couplers are still trouble-free. The down side, of course, is the ungainly, unrealistic appearance.
Assembly is a snap - just place the spring on the knob (see photo - a dab of glue is helpful if you're a beginner), and then place the coupler's D-shaped hole over the pin on your car or locomotive.
Marklin uses these couplers on most of their rolling stock (some exceptions listed later in this article), and has done so since the dawn of Z scale in 1972. As a result, the fishhook is the standard Z-scale coupler, particularly among European models from Marklin and many other manufacturers. However, the "knuckle" is the coupler of choice for North American models, mostly because of the Micro-Trains coupler described next.
Micro-Trains Magne-Matic "knuckle" couplers
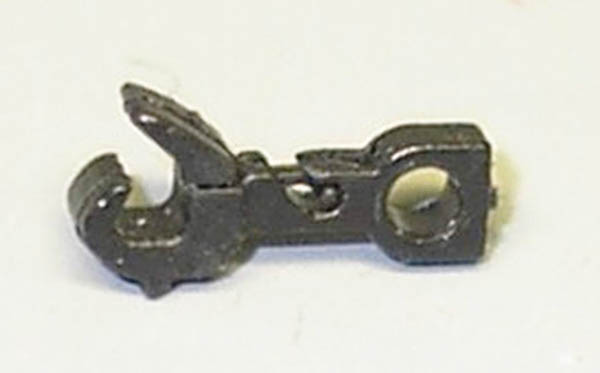
MTL couplers (shown disassembled and assembled here) are much more prototypical (at least with respect to modern couplers) in their appearance and operation, and are much smaller and less obtrusive than their Marklin counterparts. Because of this, the MTL knuckle -- as well as compatible knuckles described later -- have become the standard coupler for North American Z-scale models.
But improved realism is not without its price. MTL couplers are much more fussy than Marklin couplers, sometimes requiring adjustment (or even reassembly) to get them to work properly. They're also quite fragile; the plastic parts can break, the spring can become deformed (or lost), and the whole mechanism can jam.
Assembly is an exercise in masochism. There are six individual parts, including the housing, cover, spring, knuckle, lip, and trip pin - this diagram show how it all fits together. See Assembling & Repairing MTL couplers for details and tips if your couplers aren't springy or if they aren't staying coupled. Hint: buy MTL couplers pre-assembled.
There are several different varieties of MTL couplers, including those mounted on trucks and those intended for installation on Marklin rolling stock; see Guide to MTL Couplers and Trucks for the full line. See also Micro-Trains Fishhook couplers.
MTL couplers can be installed on a variety of rolling stock. Here are instructions for installing MTL couplers on Marklin locomotives, on Marklin cars, and on American Z Lines rolling stock. And since most MTL couplers mount with nothing more than a single screw, you can install one even on rolling stock without any coupler mount.
American Z Lines "knuckle" couplers
Nearly twenty years after MTL introduced the Z-scale version of the Kadee knuckle coupler, AZL developed their own knuckle coupler to accompany their rolling stock (mostly because of MTL's baffling decision described at the beginning of this article). These are the couplers included with all American Z Lines locomotives and rolling stock, such as the F59PH and associated passenger cars, the GP7, SD70, and coalporters. (The exceptions are the older AZL brass engines, which at least until the late 2000s came equipped with MTL chassis-mounted knuckle couplers.)
AZL couplers have a similarly-realistic "knuckle" appearance to MTL couplers, and are meant to mate with MTL knuckles. AZL did away with the fussy metal spring in favor of an integrated plastic spring, which makes their four-piece couplers much easier to service than MTL's six-piece design. Plus, it eliminates the slinky effect exhibited when starting or stopping long trains with MTL couplers (which, admittedly, has never really bothered me).
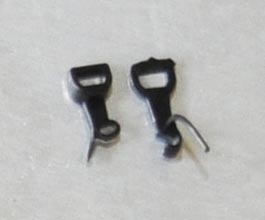
The downside is that the early units (shown here) don't work very well. Automatic coupling is, at best, a gamble - sometimes they click together as they should, but other times they won't couple even when I force the cars together. My AZL couplers are even crankier when I try to mate them with MTL couplers (though others have reportedly had better luck than I). But my biggest beef is that the early AZL couplers are lousy at staying coupled; my F59PH California Corridor set couldn't make it once around my track without dropping at least one car until I swapped out the AZL couplers for MTL #905s.
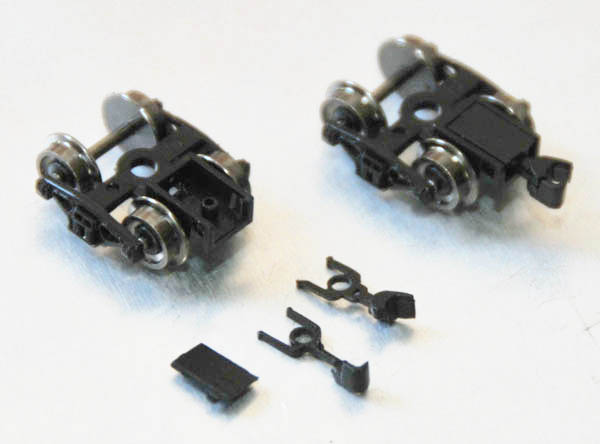
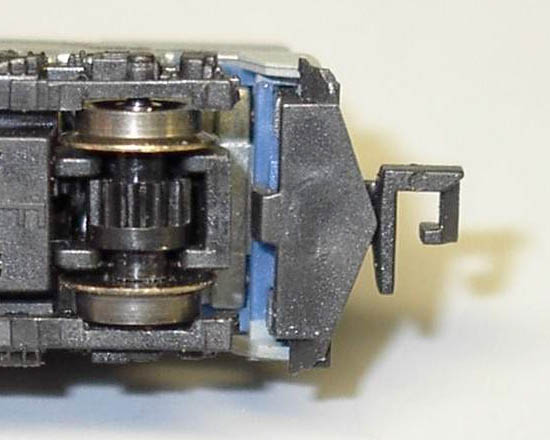
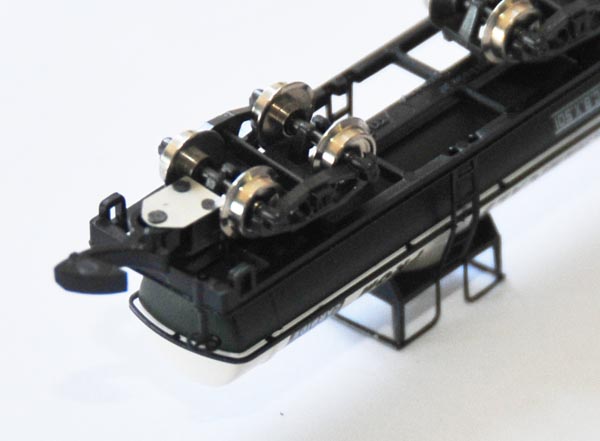
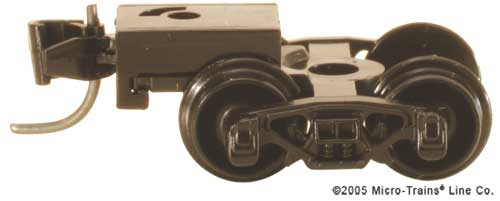
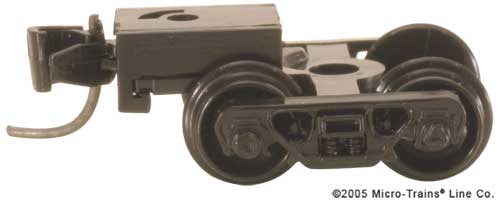
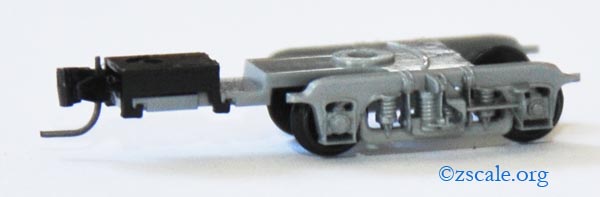
So in 2009, AZL introduced an improved version they call the "Auto-Latch" coupler, shown as part of the AZL Bettendorf truck in this photo. AZL Auto-Latch couplers are much better at staying coupled then their predecessors, and the whole mechanism appears to be much stronger than MTL's knuckle. They also couple with their own more easily, and even mate nicely with MTL knuckle couplers. As a bonus, the metal wheels on all of AZL's trucks are so superior to MTL's featherweight plastic wheelsets it's not even funny.
Alas, there remain three drawbacks to the Auto-Latch design. First, the coupler spring is extremely stiff; it doesn't sway from side-to-side as easily as MTL or Marklin couplers, and therefore may cause derailing with mixed-mounted couplers (though I haven't encountered this personally). Second, Auto-Latch shanks are longer than those on MTL units, creating a broader space between coupled cars (sorry, fans of close-coupling). Third, AZL units offer no automatic uncoupling.
Tip: some of AZL's truck-mounted couplers, like the un-assembled one in the photo, have two tabs that allow it snap on or off AZL's locomotive trucks. These couplers have been known to fall off fairly easily; AZL recommends gluing them to solve this problem. But hold that glue if you're planning on replacing them with MTL couplers, as you'll need to reuse AZL's tabbed coupler housing.
Note: see the Z Scale Truck and Coupler Guide for further analysis of the Auto-Latch coupler and how it measures up against its competitors.
Full-Throttle "Bowser Bucklers" knuckle couplers
All of my extraordinary Full-Throttle rolling stock came with MTL couplers pre-installed, so I have no experience yet with Uncle Will's newest coupler (released in mid 2009).From reports, it appears that Bowser Bucklers offer a knuckle design, metal wheels (hooray), and integrated plastic springs (akin to AZL couplers).
Micro-Trains "fishhook" couplers
Until a few years ago, every Micro-Trains car and locomotive was available with either MTL Marklin-style fishhook couplers or MTL knuckle couplers (a "-2" after a MTL model number meant it came with knuckle couplers), but Micro-Trains phased out the Marklin-coupled versions in the mid 2000s. Although it may seem like a good idea to get only Marklin-style couplers to work with the Marklin cars and locomotives you already have, Micro-Trains Marklin-style (MT #907 & #908) couplers, in a word, suck. They have most of the disadvantages of standard MTL couplers (such as the complexity of all the parts), they don't work very well, and are even uglier than Marklin couplers. Avoid them if at all possible, although they remain the only practical way to install Marklin-compatible couplers on MTL, AZL, and Full-Throttle locomotives and rolling stock.
Although they're no longer available preinstalled on Micro-Trains rolling stock, you can still get these couplers by themselves (#907 and #908) or on trucks (look for a "-M" after the model number; e.g., 995 80 213-M).
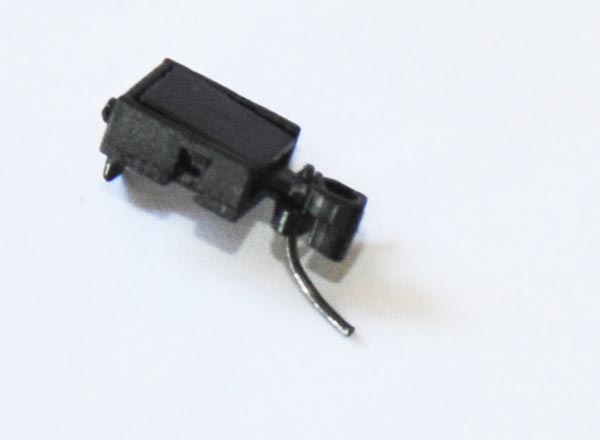
Z-Modellbau "fishhook" couplers
The ingenious photo-etched coupler on this stunning powered K�f II by Z-Modellbau was designed by Dr. Andreas Scheibe to mate with Marklin rolling stock. It does away with the bulky coupler box used on Marklin units (for which there is obviously no space here), yet works remarkably well. It mounts only with a thin, flexible wire, which also acts as the coupler spring. Obviously, it's too thin to mate with other Z-Modellbau couplers, but that's hardly the point. It's elegant and simple, and a nice example of industrial design.
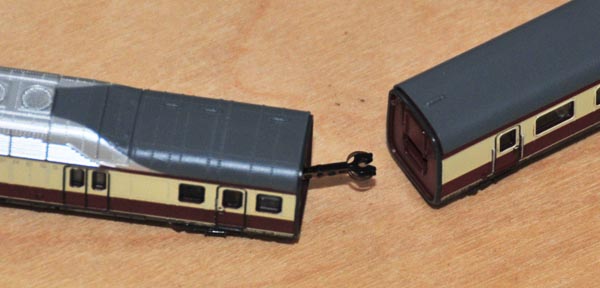
The Marklin drawbar is a permanent coupler designed to connect two Marklin locomotives for close-coupling, and without any slinky effect. It comes pre-installed on Marklin's F7 A-B-A sets, which must be permanently coupled to accompany the wires that span between the two powered units.
Marklin non-permanent drawbars
This variation of the Marklin drawbar, previous, snaps off for easy removal. While the permanent drawbar is necessary for multiple wired units, this non-permanent version is used to close-couple units that can be safely disconnected. For instance, it connects the tender of the Marklin's 81360 steam-powered rotary snowplow with the front of the included 2-10-0 Class 50 locomotive.
Marklin conductive close-couplers
Used on their TEE, ICE, and other multi-unit sets, Marklin developed proprietary couplers to not only close-couple the powered locomotives and cars but to transmit electricity between them. (The longer coupler shown is used by the first-generation ICE set, 8871, and the shorter is from the 8873 TEE set.)
Not only are they totally incompatible with all other couplers, but they even vary from one Marklin multi-unit set to another; for instance, the first-generation 8871 ICE set (shown here) uses different couplers from the second-generation 88712 ICE-3 set, both of which use different couplers from the 8873 TEE set (shown in this photo). Of course, since these cars aren't meant to couple with any other cars or locomotives, it hardly matters.
Warning: Resist the temptation to glue the copper contacts to the plastic coupler bodies; they need to retain their spring action to maintain contact with the cars. If a coupler becomes damaged, carefully remove the contact from the body by cutting away the plastic welds (the less cutting you do, the easier reassembly will be). Then bend it back into shape and use a soldering iron to re-weld the pins and fasten the pieces together. (If the coupler is damaged beyond repair, you can get replacements from any Marklin dealer.)
Here is a photo of a coupler from the later-generation Marklin 88712 ICE (submitted by a reader). There have reportedly been problems with this coupler, included difficulty in coupling as well as unintended uncoupling. (If anyone has had success improving the performance of these couplers, I'd love to hear about it.)
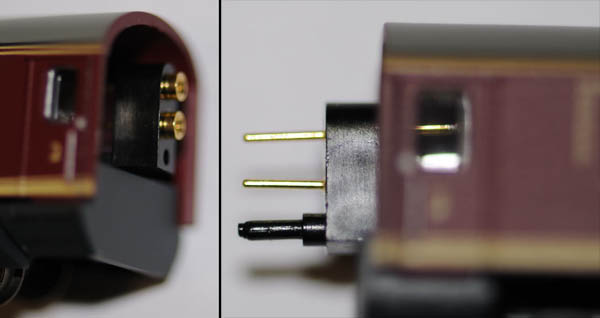
Later model tend to have improved couplers, such as those from the Marklin 88720 3-car set (pictured), which replace the flimsy separate couplers with fixed pins. The two metal pins conduct the power while the plastic pin holds the train together. Although this design means imposes a coupling gender on each car end, performance is greatly improved over earlier designs.
Tip: See Improving Locomotive Power Pickup for a way to connect each intermediate car's local power to the cross-train engine-to-engine line, and improve power pickup for the entire train.
These funny square couplers are very common in N scale, but never seen in Z scale until Pro-Z started using them on their Japanese locomotives and rolling stock. Although slightly knuckle-like in appearance, Rapidos automatically couple by sliding one-over-the-other.
Standard N-scale Rapido couplers support remote uncoupling by use of plastic trip pins underneath (akin to Marklin's fishhooks), but since these pins appear absent on Pro-Z's offerings, I don't expect they support this feature.
I don't yet have personal experience with these couplers in Z-scale, although I always found N-scale Rapidos to be particularly ugly, and their square shape makes coupling on a curve difficult. G.A. Hamilton's excellent Japanese ZJ Gauge page shows that they can be converted to MTL knuckle couplers. (Thanks to G.A. Hamilton for the photo.)
RealZJ couplers
What appears to be another MTL-compatible knuckle coupler, these come on Akia's RealZJ locomotives and rolling stock.
I don't yet have personal experience with these couplers in Z-scale, but G.A. Hamilton's excellent Japanese ZJ Gauge page shows that they can be converted to MTL knuckle couplers. (Thanks to G.A. Hamilton for the photo.)
Railex couplers
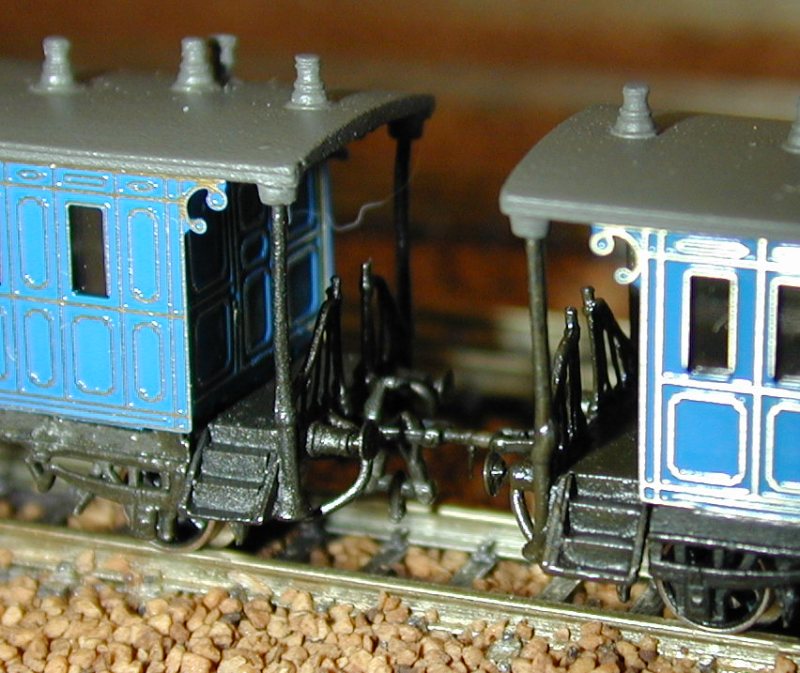
These uncommon couplers were used in the Railex-produced Marklin 8870 and 8869 "King Ludwig" sets. They offer no automatic coupling or uncoupling, and don't stay together particularly well unless your track is perfectly level and uniform. But they're prototypically accurate for trains from the late 19th century, and they get the job done. They're even (scarcely) available separately as Railex # 9150, should you desire to convert any of your other rolling stock.
Nelson Gray fishhook couplers
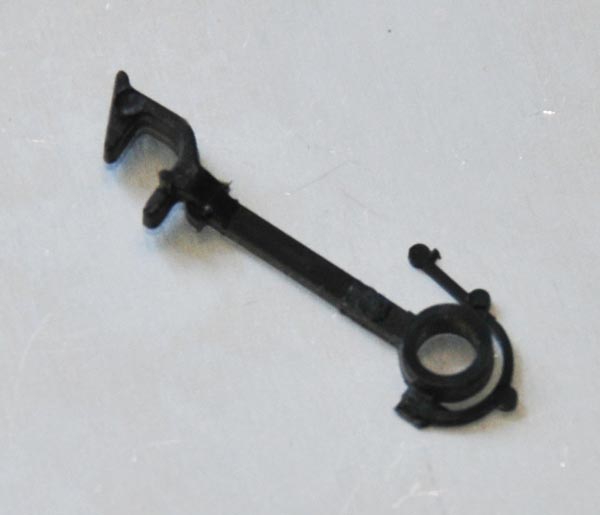
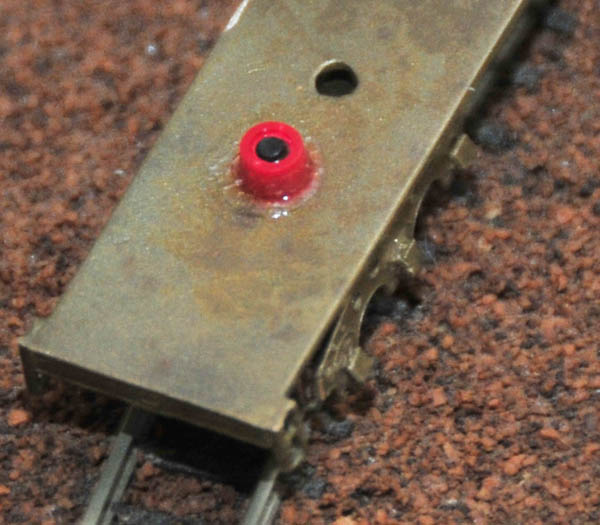
Much of Micro-Trains early rolling stock (including the F7) was actually produced from tooling created by Nelson Gray, who was the first to produce American rolling stock in Z scale in the late 1970s. This beast was used on some of those early units (in particular, the dummy F7 chassis) to mate with Marklin fishhook couplers, and attaches to the truck pivot point; note the integrated plastic centering spring. It's unlikely you'll ever see one of these up close, as production ceased nearly 30 years ago. The Micro-Trains #907 is an obvious descendent of this early coupler.
For more on Nelson Gray, see Riley O�Connor's History of Z-Scale.
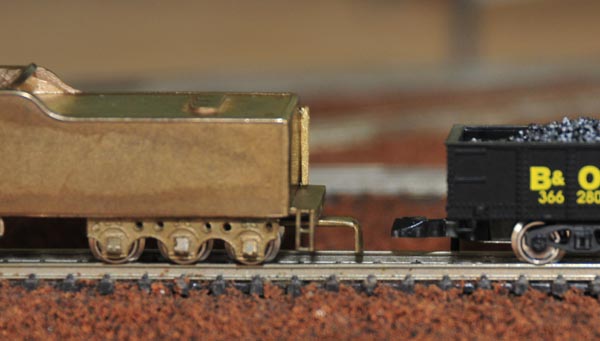
The Pin
Some manufacturers, not wanting to invest the money, tooling, or time into accommodating existing couplers (not to mention developing their own), use a simple pin to mate with Marklin fishhook couplers.
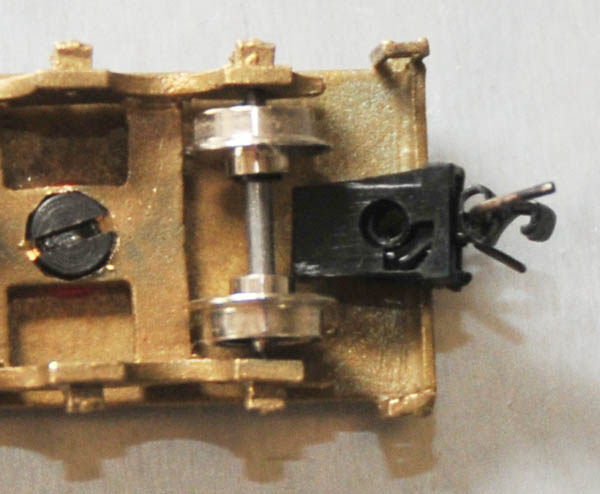
For instance, the three-axle truck on the tender in the photo (of the Westmodel Hudson F6) connects quite nicely to Marklin rolling stock, even if it doesn't look all that great. But since it's an American locomotive and all of my North-American rolling stock uses MTL knuckle couplers, I've since replaced the pin with an MTL #905 knuckle coupler.
Manufacturers also use pins where space doesn't permit a full coupler housing; the Freudenreich ZF 100b Diesel Box Cab uses pins front and rear. Even Marklin uses a simple pin as a front coupler on some of their 2-6-0 steam locomotives, such as the 8801, 8894, 8897, 88951, 88952, 8104, 81561, and 81562.
Note: Pins don't mate with knuckle couplers.
Automatic Coupling
Aside from looking good, couplers have to do three things:
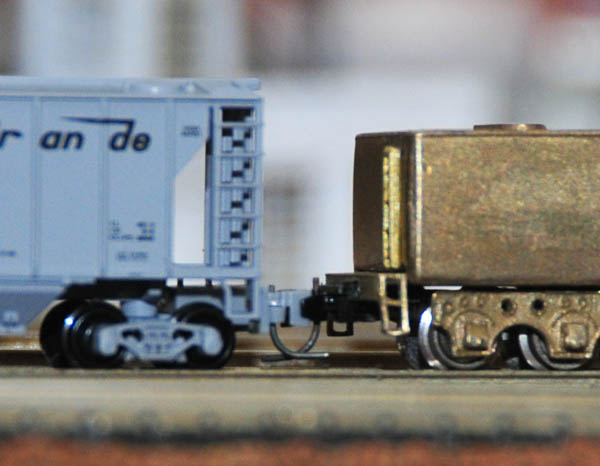
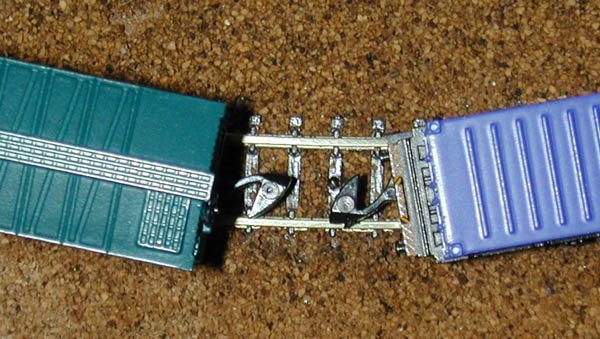 Since Marklin couplers are large, their ability to automatically couple in nearly every circumstance is excellent.
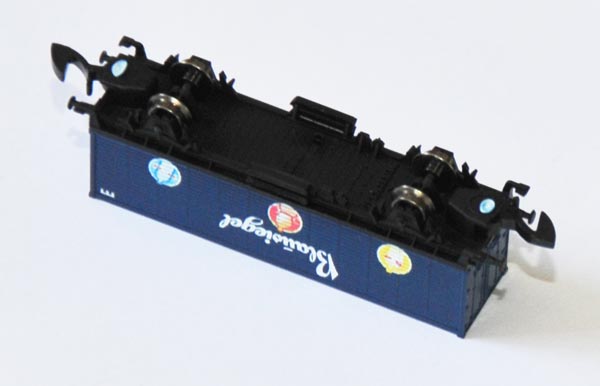
This photo shows two cars, one four-axle boxcar with truck-mounted couplers, and one two-axle container car with chassis-mounted couplers, about to mate on a curve.
Note that despite the different mountings, they are still perfectly aligned.
Since Marklin couplers are large, their ability to automatically couple in nearly every circumstance is excellent.
This photo shows two cars, one four-axle boxcar with truck-mounted couplers, and one two-axle container car with chassis-mounted couplers, about to mate on a curve.
Note that despite the different mountings, they are still perfectly aligned.
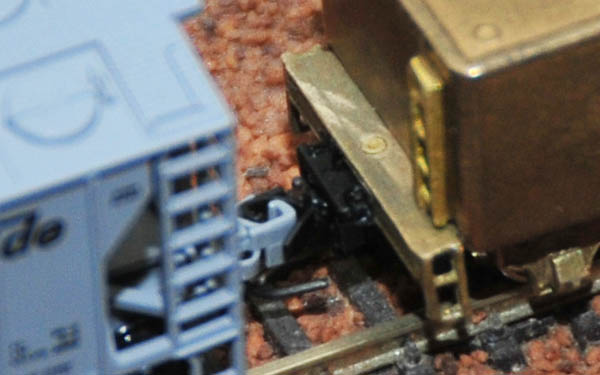
The only time I've seen Marklin couplers fail is when the train collides with a car at rest at too high of a speed.
Instead of coupling normally, the two hooks get caught in each other, making manual intervention necessary.
(Most knuckle couplers don't seem to have this problem.)
The solution, of course, is to s-l-o-w d-o-w-n.
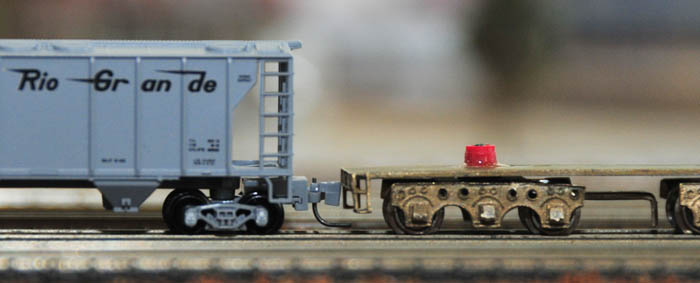
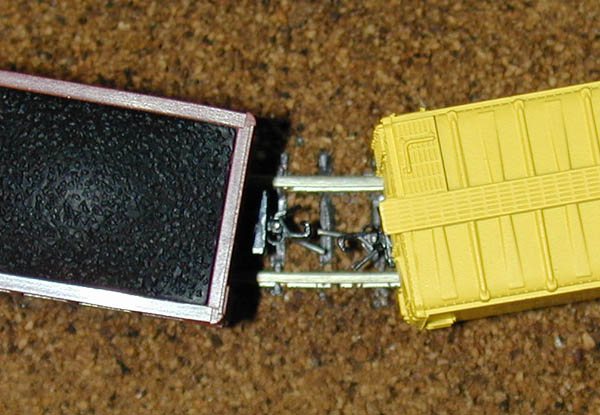 Here, a Micro-Trains 50' boxcar with chassis-mounted couplers and a PennZee 3-bay hopper with truck-mounted couplers are about to mate on a curve.
Because the couplers are so small and mounted differently on each car, the automatic coupling will fail.
Here, a Micro-Trains 50' boxcar with chassis-mounted couplers and a PennZee 3-bay hopper with truck-mounted couplers are about to mate on a curve.
Because the couplers are so small and mounted differently on each car, the automatic coupling will fail.
 Now, this coupling problem isn't necessarily a indictment of MTL's design, but rather merely a limitation of any small coupler when not mounted consistently.
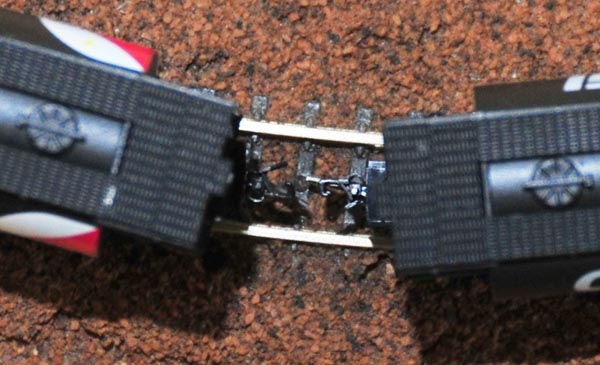
In fact, this photo shows two identical Full Throttle cylindrical hoppers, each with truck-mounted couplers, approaching one-another on a tight curve.
As you can see, these cars will couple successfully.
Now, this coupling problem isn't necessarily a indictment of MTL's design, but rather merely a limitation of any small coupler when not mounted consistently.
In fact, this photo shows two identical Full Throttle cylindrical hoppers, each with truck-mounted couplers, approaching one-another on a tight curve.
As you can see, these cars will couple successfully.
Tip: When MTL couplers don't couple under ideal circumstances like this, it's usually due to a broken part, a damaged or missing spring, or compression from an overly-tight mounting screw.
Typically, the only remedy is to replace the coupler, or repair it by disassembling and rebuilding.
 Of course, switching yards don't have curves like these, and if your yard is the only place you'll be coupling and uncoupling, then this may be of little concern to you.
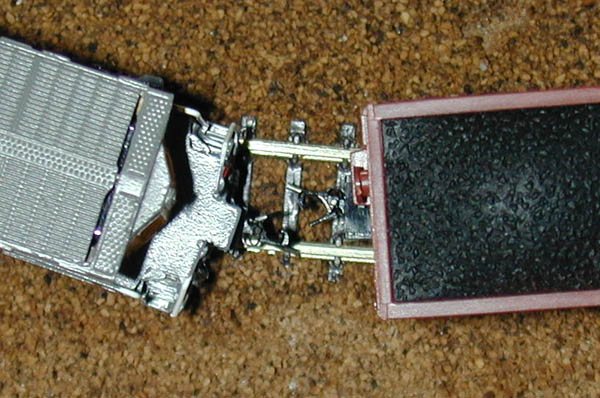
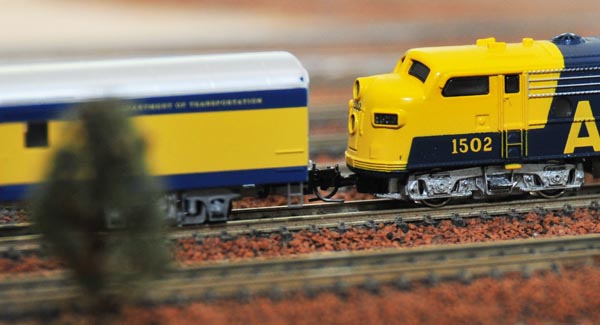
But consider this photo, which shows an American Z Lines C44-9W and a PennZee hopper attempting to couple.
Automatic coupling isn't all that's at stake here; when the C44 and hopper are coupled, both couplers must bend substantially to stay connected as shown in this photo.
The two couplers exert excessive force against each other when traveling around a curve, which can very easily derail lighter-weight cars; it only gets worse when the coupling is also bearing the load of additional cars further down the train.
Of course, switching yards don't have curves like these, and if your yard is the only place you'll be coupling and uncoupling, then this may be of little concern to you.
But consider this photo, which shows an American Z Lines C44-9W and a PennZee hopper attempting to couple.
Automatic coupling isn't all that's at stake here; when the C44 and hopper are coupled, both couplers must bend substantially to stay connected as shown in this photo.
The two couplers exert excessive force against each other when traveling around a curve, which can very easily derail lighter-weight cars; it only gets worse when the coupling is also bearing the load of additional cars further down the train.
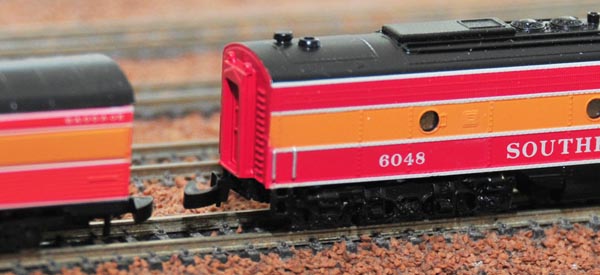
While chassis-mounted couplers are more prototypical (i.e. like the real world), their orientation causes them to point outwards on a curve, away from the center of the track.
The gargantuan C44 has a long overhang, causing the coupler to stray even further from the track center and making the problem even worse.
The tighter the curve, the further away from center chassis-mounted couplers point.
 One solution is to convert all cars with chassis-mounted MTL couplers to truck-mounted MTL couplers so that the couplers automatically pivot in the correct direction on a curve - apparently, even Micro-Trains has started doing this on their newer rolling stock.
This photo shows two unmodified Micro-Trains boxcars: the newer one on the left has a truck-mounted coupler, and the older one on the right has a chassis-mounted coupler.
The trucks on both boxcars are turned to the right, but only the coupler on the newer car turns with it.
One solution is to convert all cars with chassis-mounted MTL couplers to truck-mounted MTL couplers so that the couplers automatically pivot in the correct direction on a curve - apparently, even Micro-Trains has started doing this on their newer rolling stock.
This photo shows two unmodified Micro-Trains boxcars: the newer one on the left has a truck-mounted coupler, and the older one on the right has a chassis-mounted coupler.
The trucks on both boxcars are turned to the right, but only the coupler on the newer car turns with it.
Essentially, the conversion involves removing the old trucks (held in with a plastic peg) and the coupler (mounted with a tiny brass screw), and installing new MTL trucks with couplers (Micro-Trains #954 "Bettendorf", #955 "Archbar", or #956 "Roller Bearing"). (The style you choose should match the ones you're replacing and/or the historical prototype - see truck styles for details.) This conversion will improve automatic coupling on a curve, and may even help reduce derailments. The downside is the cost (over $5.00 a pair), your time and aggravation, and the minor compromise in prototypical appearance and operation.
Note: It has been suggested that chassis-mounted couplers are better for operations and when going in reverse. For instance, Glen Chenier writes, "Truck-mounted MTL couplers can derail when backed over Marklin turnouts as the trucks get a sideways twisting force and the flanges then tend to pick frogs and points. Not a problem on regular track with smooth rail joins, don't know about other brands of turnouts. I once changed several cars to truck-mounted and when I saw the reverse-on-Marklin turnouts problems immediately changed them all back to their original body mount." The instructions in Stop Turnout & Double-Slip Switch Derailing should solve this problem, however.
Another solution that will reduce derailments, regardless of the mounting of the coupler, is to add a little weight to the more troublesome cars. Two small weights, placed inside the boxcars, directly above the trucks, will help the cars stay on track; the downside is that your locomotives will be able to pull fewer cars.
Staying Coupled
Marklin couplers usually do a better job of staying coupled than MTL or AZL couplers. If a train accelerates and slows down rapidly, such as going down a hill, MTL couplers can easily let go. This is partly due to the "slinky" effect created by all those tiny brass springs, partly due to the respective size, and partly due to the way MTL couplers are automatically uncoupled. Marklin couplers do not appear to be susceptible to this, even though their own springs cause a similar "slinky" effect.Note: AZL couplers and Full Throttle "Bowser Bucklers," both equippped with plastic springs, eliminate the slinky effect. AZL's second-generation "Auto-Latch" couplers discussed here, in particular, do a much better job of staying coupled than their early first-generation units.
Tip: Glen Chenier suggests that the slinky effect can be reduced by installing axle-restraining springs on the last car to add a little drag. Micro-Trains Line makes these for N scale (part #1953) but they work on Z scale too.
Since they're so much smaller than Marklin fishhooks, MTL and AZL couplers are also more susceptible to uneven track, which can raise one coupler significantly higher than another, causing them to lose contact. The obvious fix to this problem is improve your track-laying technique. :)
Sharp curves and chassis-mounted MTL couplers are not a good mix: in addition to derailing, the sharp bending can cause MTL couplers to unhook (Marklin couplers and truck-mounted MTL couplers don't have this problem). See the previous section for more on this.
|
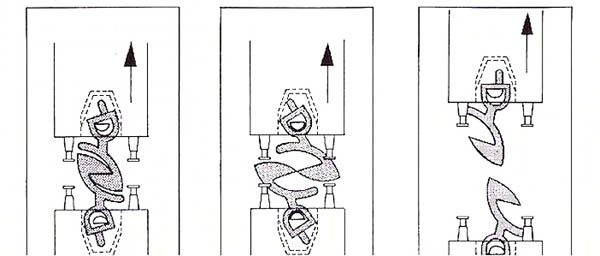
Improve the Grip of MTL Couplers 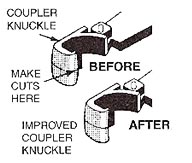 To be sure you receive maximum gripping performance from your Magne-Matic® Couplers, you may wish to modify the coupler knuckle.
The slightly rounded surface of the knuckle hook, under stress of a long train, may cause the couplers to slip up or down against each other causing uncoupling.
To eliminate this slippage, cut the face of the coupler knuckle from the top and bottom edges of the knuckle hook towards the middle, as shown in the figure.
To be sure you receive maximum gripping performance from your Magne-Matic® Couplers, you may wish to modify the coupler knuckle.
The slightly rounded surface of the knuckle hook, under stress of a long train, may cause the couplers to slip up or down against each other causing uncoupling.
To eliminate this slippage, cut the face of the coupler knuckle from the top and bottom edges of the knuckle hook towards the middle, as shown in the figure.
This modification will alter the angle of the coupler face allowing more contact between couplers. While holding the knuckle shank with a clamp, carefully make angled cuts of no more than 4 degrees towards the center of the knuckle hook. -- Micro-Trains Line |
Remote Uncoupling
To uncouple two cars without manual intervention, you'll need to install a device specific to the coupler type:
Marklin
You'll need to install a Marklin 8587 or 8597 uncoupling track section in any location you wish to uncouple cars with Marklin couplers, presumably in a yard. And since they are electric solenoid mechanisms, they must be wired to a switch and a power source.
To uncouple Marklin couplers, a train must be in motion over the uncoupler. Push and hold the button when the desired coupling is almost over the uncoupler, which will cause the uncoupler to rise about 1/8th-inch to mechanically trip tiny pins on the underside of the fishhooks, and the train will separate at that point. The reliability of this procedure, in my experience, is about 80% (assuming ideal conditions). The down side is that Marklin uncouplers are expensive, ugly, and installation requires wiring.
Micro-Trains
To uncouple MTL couplers, the train must be stopped with the desired coupler directly over a permanent magnet (such as MTL #921) installed under the tracks. Briefly put the train in reverse, and then move it forward again. The magnetic field will cause the two "Magne-Matic" trip pins to separate, which will release the knuckles. It's an absolutely ingenious mechanism, although good reliability requires careful selection and installation of magnets, not to mention some practice.
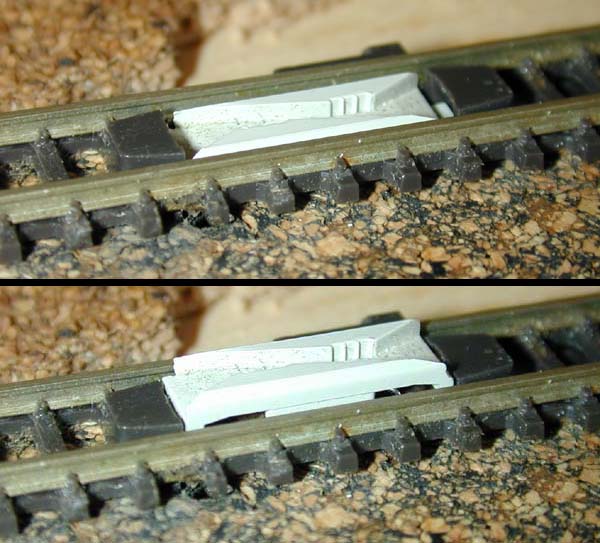
To make magnematic uncoupling more reliable, you may need to adjust your trip pins. For one, the pins should all be at the same height; if they're not lined up, they won't exert sufficient repulsive force on one-another, and the uncoupling won't work.
Second, the pins on any two coupled cars should be parallel to one-another. For a quick fix, line up all your MTL-equipped cars side-by-side, and look down from above to spot any pins that aren't pointing in the same direction as the rest. Gently twist any pins not parallel to the others, and you're good to go.
The magnet must be the right type; the rare earth magnets I've tried don't seem to work at all, though this may've been caused more by the shape and orientation of the magnetic field than of the magnet material. It must also be strong enough to uncouple the cars, yet small enough to be hidden under the track (see this for what I've done). The benefit is that magnets are much cheaper than Marklin uncoupling tracks, require no wiring of any kind, and are completely invisible once installed.
|
An Alternative to Permanent Magnets It's probably not a good idea to install permanent magnets on your main-line, lest they accidentially uncouple a passing train that happens to exhibit a little bit of the slinky effect. But electro-magnets don't have this problem; they're only magnetized when activated remotely (somewhat like Marklin's mechanical uncouplers).Manfred J�rger makes the #SJ011 Magnetentkuppler electromagnet for this purpose. Also available are #SJ012 Magnetanker for magnetizing Marklin fishhook couplers so they work with magnetic uncouplers as well. |
American Z Lines
AZL couplers offer no automatic uncoupling.
Full-Throttle "Bowser Bucklers"
Full Throttle couplers appear to offer no automatic uncoupling.
Tip: If you have rolling stock with both MTL and Marklin couplers, you'll most likely end up installing both types of uncouplers in your layout. I've installed magnets under my Marklin uncouplers so the single section of track serves double-duty; see Converting Turnouts to Under-table Drive for details.
Note: There are also tools designed especially for manually uncoupling two cars with MTL couplers without removing either of them from the tracks, but I've never used one. A standard awl reportedly does the trick nicely, and should work for Marklin couplers equally well.
Lastly, there's the matter of manually removing cars from the tracks when they're coupled to other cars. When I lift a car with Marklin couplers, it usually doesn't give me a fight. However, lifting a car with MTL couplers usually takes its neighbors with it. Sigh.
Coping With Multiple Coupler Types
If you're like me and haven't already committed your collection to only one coupler type, you have some cars and locomotives with Marklin couplers, others with MTL couplers, and still others with AZL, or some of the other lesser-known variants. You can either switch them all to the same type, which can be expensive, time-consuming, and at times, a headache, or find ways to cope:
Commit only certain car types to certain couplers types.
Since nearly all of my European trains are made by Marklin, I've decided to keep Marklin couplers on those items. But the majority of my North American freight and passenger trains use mostly MTL couplers, so I've converted the few non-MTL North American items to MTL couplers. Since I rarely mix the two, this is an easy, low-cost solution. The drawback is the inability to, say, attach modern American freight cars to Swiss provincial passenger trains.
Convert only certain cars
While appearance is a major concern when choosing couplers, the money and time required to convert an entire train is substantial (and might as well go to purchasing more rolling stock!) To make a Marklin train look better, try replacing only those couplers that are visible, such as the one on the front of a locomotive and the one on the back of the last car.For instance, since my American Z Lines E8 pulls a set of Marklin Daylight Express passenger coaches, all with Marklin fishhook couplers, I installed a fishhook coupler in back. But for appearances, I put a MTL knuckle coupler in front.
Create a handful of "transition" cars
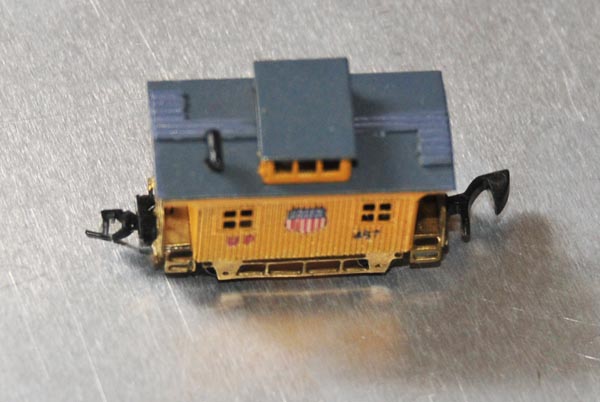
If you have rolling stock with multiple coupler types and you anticipate mixing and matching them, yet don't want to spend the money and the time to convert the couplers on half your fleet, consider committing a few "transition" cars to have one of each coupler type. For instance, the Portland Railcar UP caboose in this photo has a Marklin coupler on one end and a Micro-Trains coupler on the other, allowing me to add it to the end of any train I build.
Tip: If you don't want to perform the conversion yourself, Zscale Monster Trains sells transition cars, each equipped with an MTL knuckle coupler on one end and an MTL fishhook coupler on the other.
Sometimes, no coupler is the best coupler
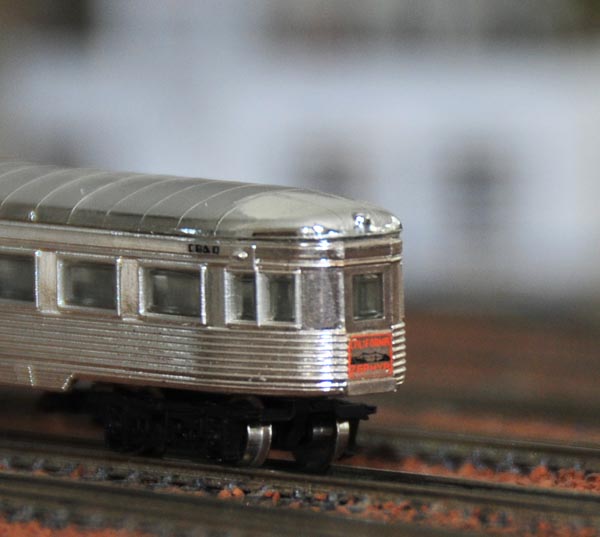
While MTL couplers do look better than Marklin couplers, sometimes no coupler at all looks best. Examples are the front of any steam locomotive, the front of any Marklin F7 locomotive, and the Marklin 8816/8817 railbus. Simply removing the coupler not only provides the most realistic look, but doesn't require any additional purchase.
For instance, in what amounts to the easiest coupler conversion EVER, I just spun the rear truck 180º on this Marklin observation car, and voilà! Doesn't it look nicer without that huge hook hanging out back?
Most of Marklin's F7 units come with a nice-looking plow/pilot insert, which you can install only after removing the front coupler and spring. Likewise, some American Z Lines locomotives (such as their GP7) include detailed pilots that snap in place of the front truck-mounted couplers.
Changing Couplers on your Locomotives and Rolling Stock
The procedure for changing couplers depends on where you're starting and where you want to end up:
Putting Micro-Trains Couplers On Marklin Locomotives
Marklin fishhook couplers mount on all Marklin rolling stock in roughly the same way: the coupler's D-shaped hole fits over a pin on the chassis or truck, a spring centers the coupler, and a cover keeps everything contained. Micro-Trains #901 couplers, with the same D-shaped hole, are drop-in replacements that fit nearly all Marklin locomotives and rolling stock. (Also available are the shorter MTL #902 couplers, which are otherwise identical to the #901 - use them for close coupling.)
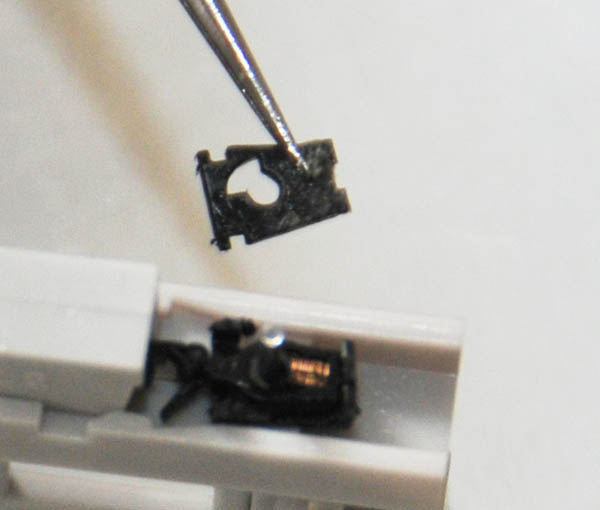
Start by placing the locomotive upside down on your work surface. If you're converting an engine with movable trucks, such as the Marklin F7 shown in this photo, use your fingernail to gently pry back the truck cover. It's not necessary to remove the cover -- in fact, it's better if you don't -- but rather just pull it far enough so the snaps prop up the cover to keep the coupler housing exposed. Then, slowly remove the Marklin coupler and spring with a pair of fine tweezers.
Installing couplers on a steam locomotive? If the engine has a tender, follow the instructions for Marklin rolling stock in the next section. If there's no tender and the coupler isn't mounted on leading or trailing wheels, go ahead and remove the screws that hold the engine's belly pan (as explained here), and without disturbing any of the drivetrain, carefully remove the coupler.
Replacing a coupler mounted on a leading or trailing unpowered truck? (Examples include the 88490 GG1, the 88065 V 32 001, the Crocodile, the 8851 Swiss class Ae 3/6II, and many of their large tender-less steam engines.) You may also need to skip to the next section to deal with these couplers; consult the photos if you're not sure.
Insert the chamfered end of the trip pin into the small hole in the knuckle (the "fingers" if the coupler were a fist) until it just protrudes out of the top. Next, insert the other end of the trip pin into the small hole in the lip (the "thumb" of the coupler), and slide the two coupler halves together.
Using the fine tweezers to hold the two halves together, place the assembly over the pin on the locomotive, as shown in this photo, making sure the trip pin points up (or down toward the rails, if the engine were upright).
Finally, grasping the spring gently with your tweezers, insert one end into the rear of the coupler box, and then squeeze the other end into place just behind the coupler. Before the whole thing jumps out and ends up on the floor, carefully pinch the truck housing closed with your fingers.
Tip: springs have minds of their own. They jump and hide, never to see the light of day again. (I must have accumulated about 40 of these infernal things on my floor; perhaps ants collect them and use them as bar stools.) To prevent yours from disappearing, insert a piece of fine thread through the spring while working with it, and then carefully pull it out when assembly is complete.
Gently tap the coupler to make sure it's springy and always returns to its center "home" position. Finally, right the locomotive, place it on your tracks, and try coupling it to a car. Make sure everything is lined up as shown in this photo.
Putting Micro-Trains Couplers On Marklin Rolling Stock
Since all Marklin fishhook couplers mount on the same D-shaped pin, the procedure in the previous section (for locomotives) applies to Marklin rolling stock (and steam tenders) as well. However, some minor surgery is required on most cars in order to complete the switch.
Nearly all Marklin cars with truck-mounted couplers -- plus most cars with chassis-mounted couplers -- have a coupler box like the one shown in this photo. The metal cover is held on with three tiny plastic welds.
First, remove the truck from the car - it's a snap fit on most cars, but in some cases, you may have to remove a screw. To expose the coupler housing, use a very sharp X-acto knife to carefully cut the welds and then gently pry off the cover. Make sure not to break any of the plastic pins; you'll need them later to reinstall the cover.
With the cover off, follow the directions for Marklin locomotives in the previous section.
When you're done, put the metal cover back in place, fitting it over what's left of those three pins. If necessary, use locking tweezers to keep it shut. Then, using a soldering iron with a fine tip, carefully melt the three pins to re-weld the cover to the car.
Some Marklin cars with chassis-mounted couplers (usually boxcars) have a slightly different system. Like the car in this photo, the D-shaped pin is actually part of the body, and the coupler housing is integrated with the chassis. The pin is plastic-welded to the chassis, which not only retains the coupler, but keeps the whole car together as well.
To expose the coupler, use a very sharp X-acto knife to carefully cut both welds, one on each end. These are larger welds than the ones used on truck-mounted couplers, so more cutting may be required. Try to leave as much of the pin intact as you can; you'll need it later.
With the welds cut, slowly separate the chassis from the body only about 3/16" so that the pin clears the bottom of the coupler housing and most of the mouth, but doesn't exit the upper hole. You don't actually want to pull the car completely apart.
Once you've removed the old coupler, follow the directions for Marklin locomotives in the previous section.
When you're done, squeeze the body and chassis back together so the pins re-emerge from the bottom of the chassis. Then, using a soldering iron with a fine tip, carefully melt just enough of the two pins to hold the car together. (Weld too much, and you'll ruin the pin and coupler box, cause the coupler to seize up, or damage some of the chassis details.)
Putting Micro-Trains Couplers On American Z Lines Locomotives and Rolling Stock
As described here, I'm not particularly fond of AZL couplers, though I admit most of my experience is with the first-generation units and you might end up loving their second-generation "Auto-Latch" version more than Finding Nemo. Nonetheless, I swapped out all my AZL couplers for MTL couplers so my AZL cars and engines can couple with the rest of my North American rolling stock, stay coupled to one another on my layout, and support remote uncoupling. Often this was easy; sometimes it wasn't.
First, all of AZLs brass locomotives, such as the SD45 in this photo, have chassis-mounted couplers. That means they easily take a standard Micro-Trains #903 / #905 coupler; just remove the screw that holds the existing coupler and drop the MTL unit in its place. (Since I use my AZL E8 to haul a set of Marklin SP Daylight passenger cars, I've opted for an MTL Marklin-style coupler for that engine, which I discuss here.)
Tip: tighten the screw just enough to keep the coupler housing from pivoting; tighten too much, and you'll crush the mechanism and prevent it from functioning.
AZL's beautiful injection-molded passenger cars -- the ones that come with the F59PH locomotives -- also use Micro-Trains #903 / #905 couplers. The Bombardier cars have truck-mounted couplers and the Amtrak Surfliner/California cars have chassis-mounted couplers, but both types easily take drop-in MTL replacements fixed with that same tiny screw.
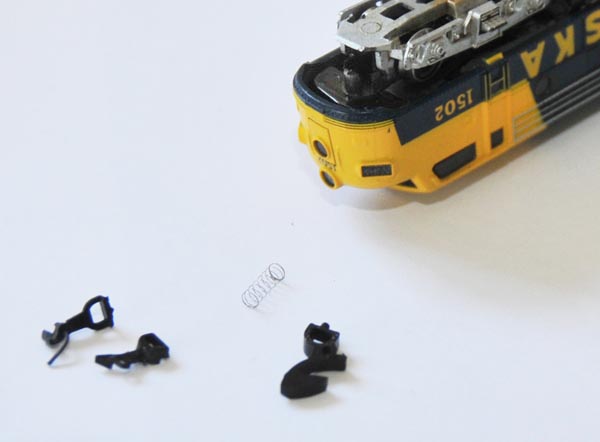
Things start getting interesting -- read "infuriating" -- when it comes to the AZL SD70M & SD75I diesel locomotives. Now, the front coupler on the SD75I shown in this photo is also conveniently compatible with the Micro-Trains #903 / #905 couplers. Just remove the retaining screw, slide out the old coupler, slide the new coupler back into the nifty pocket, and replace the screw. But the SD75I's rear coupler uses a proprietary snap-fit truck mount (see the tabs in this photo), and that complicates things.
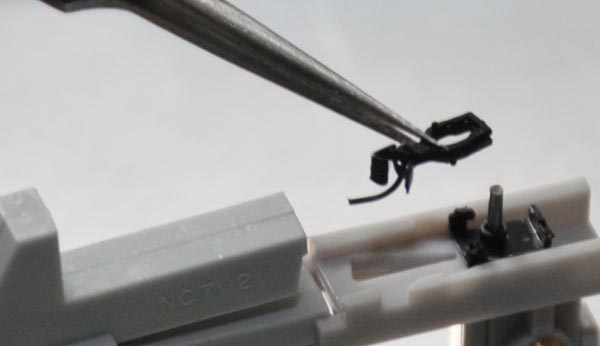
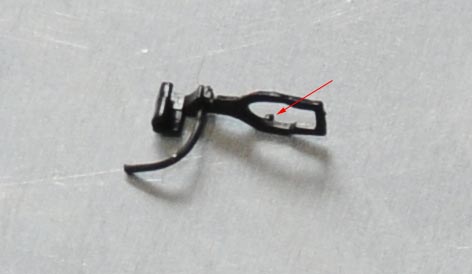
The rear coupler comes off quite easily: hold the truck with one hand and gently bend down the coupler housing with the other until it pops off. Problem is that there's no Micro-Trains equivalent for this part, but AZL suggests that you can replace the "guts" of the rear coupler with the "guts" from a Micro-Trains #903 / #905 coupler. Indeed this is possible, but not without a little surgery on the MTL coupler. Essentially, you need to cut off the two limiter pins -- one on the knuckle and one on the lip -- as shown in this photo, or they won't fit inside the AZL housing. Make your cuts flush so the coupler can move freely when installed.
Once you've modified the two halves of the MTL coupler, take the AZL coupler assembly apart. You'll need to keep the AZL housing and cover, but you can toss the two AZL knuckle pieces back in the box. Prop up the AZL housing with a "third hand" or a pair of locking tweezers, and then carefully assemble the modified Micro-Trains knuckle and lip, along with the MTL trip pin, as described here. Unfortunately, the pivot hole in the AZL housing is smaller than the one in the MTL housing, so you can't use the Micro-Trains #702 jig for this exercise. Pity.
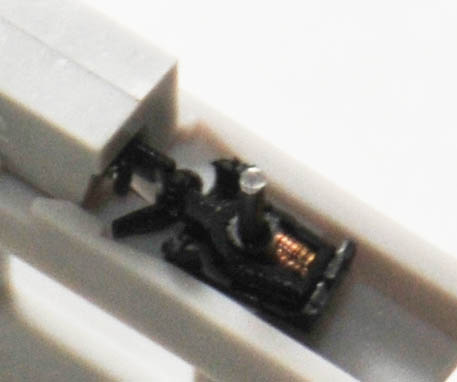
When you're ready, place the MTL knuckle assembly over the rod in the AZL housing (you may have to hold it in place with a second pair of locking tweezers) and then squeeze in the spring. Quickly yet carefully place the AZL cover over the mechanism and press-fit it until it snaps into place; if it doesn't fit, you probably didn't flush-cut the limiter pins. When you're done, your assembled coupler should look like this; make sure to confirm the orientation of the MTL trip pin and the AZL mounting tabs.
Test your work by gently tapping the coupler to make sure it's springy and always returns to its center "home" position. The last step is to snap the assembled AZL/MTL hybrid coupler thingy back onto the rear truck of your locomotive, which should be rather easy. The completed installation should look like this photo.
Putting Marklin-Compatible Couplers On Micro-Trains Locomotives
I suppose I'm not too kind to MTL fishhook couplers, but they remain the only practical way to add Marklin-compatible couplers to most non-Marklin rolling stock. Micro-Trains makes several different fishhook products:
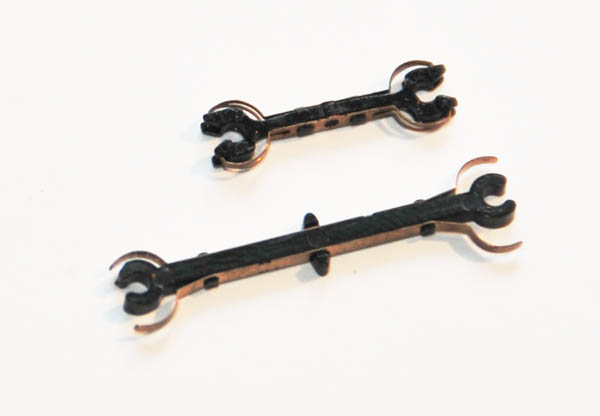
The #908 is the most useful fishhook product, in that it can be installed in place of the two knuckle halves in any Micro-Trains or American Z Lines coupler.
Just follow these instructions, substituting the #908 for the knuckle/lip/trip-pin assembly. The middle coupler in this photo is an assembled MTL #905 coupler with a #908 installed (the #908 is shown by itself to the right).
The #907 fits around a truck mount on most of MTL's older rolling stock with chassis-mounted couplers. Pretty it aint, but installation is a snap.
First, take off the old coupler by removing the tiny screw. Then pop off the truck by pulling out the plastic bolster pin. Place the #907 over the truck pivot, and align the plastic spring against the corner where the boxcar body overhangs the chassis. Reinstall the truck over the coupler and press in the bolster pin to hold it all together.
If you don't feel like taking apart a Micro-Trains coupler -- and who can blame you -- you can buy nearly any Micro-Trains truck with Marklin-compatible fishhook couplers preinstalled.
Start by consulting the Guide to MTL Couplers and Trucks to find the correct replacement; then just add an "-M" to the end of the part number. For instance, the Roller Bearing trucks shown in this photo are part # 004 02 031-M. Trucks for Micro-Trains Line's gorgeous passenger coaches are part # 995 80 213-M with fishhook couplers. If retrofitting a GP35, GP9, or F7 locomotive, get a pair of 004 02 051-M truck side-frames with Marklin-style couplers preinstalled.
Tip: trucks with fishhook couplers preinstalled are the easiest conversion path, but certainly not the cheapest. For instance, MSRP for a pair of 004 02 051-M truck side-frames is about US$14, whereas two pairs of #908 couplers -- enough for two locomotives -- retails for under three bucks.
Want to do the reverse and swap out your old MTL fishhook couplers with MTL knuckles? See the next section for instructions.
Replacing MTL Fishhook Couplers with MTL Knuckle Couplers
So, you've got some old Micro-Trains rolling stock from the days when they sold their trains with their awful fishhook couplers, and you'd like to swap them out for knuckle couplers. First thing you need to do is assemble a shopping list of parts.Start by identifying the couplers you've got in the first section of the Guide to MTL Couplers and Trucks. Note that different types of rolling stock may have different mounting types, so you'll need a variety of new couplers to match each car and locomotive you've got.
- For each #908 you have, buy a #905 or #901 to replace it.
- For each #907 you have, you can either replace it with a truck-mounted coupler (#954, #955, #956, or #971, depending on the style), or you can mount a chassis-mounted coupler (#905 or #901). See Automatic Coupling if you're not sure whether to go truck-mounted or chassis-mounted.
- Finally, for old MTL locomotives with knuckle couplers, you can either replace the truck frames entirely with part #949, or you can save some money and just swap out the couplers with part #905 or #901.
Tip: if you're considering buying just the bare-minimum of parts so that you can reassemble the couplers yourself, check out this section to make sure you're up to the task.
For installation instructions for any of these coupler types, see the previous section.
Putting Marklin-Compatible Couplers On American Z Lines Locomotives
I installed a Micro-Trains fishhook coupler on my American Z Lines E8 locomotive so it could tow my matching set of Marklin Southern Pacific "Daylight" passenger cars, and it was certainly much easier and cheaper than converting all of the cars to MTL couplers.
Essentially, a Micro-Trains fishhook can be installed anywhere a Micro-Trains knuckle coupler will fit. Just follow these instructions to retrofit your AZL cars and locomotives, using an MTL #908 fishhook whenever MTL knuckle parts are called for.
For instance, my E8 required a Micro-Trains #905 coupler assembly with a #908 fishhook installed in place of the MTL knuckle parts, just like the middle coupler in this photo. The same is true for any rolling stock that takes a #903 / #905 coupler.
For installations that require you keep the proprietary AZL coupler housing, like the rear coupler on the SD75I / SD70M locomotive, all you need is a MTL #908 fishhook and an MTL #915 spring (part # 002 10 005). Make sure to remove the limiter pin from the #908 as described here.
Replacing Nonstandard or "Pin" Couplers With Any Standard Coupler
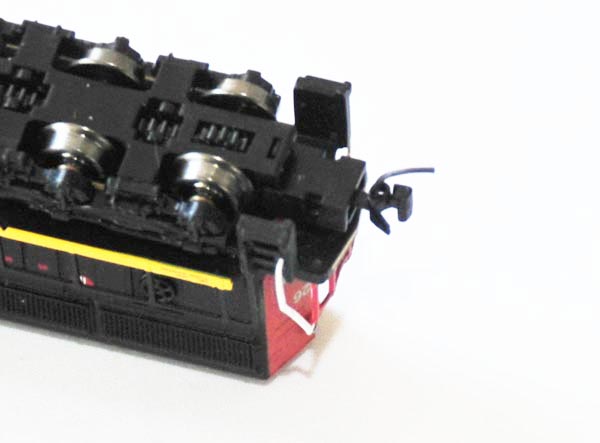
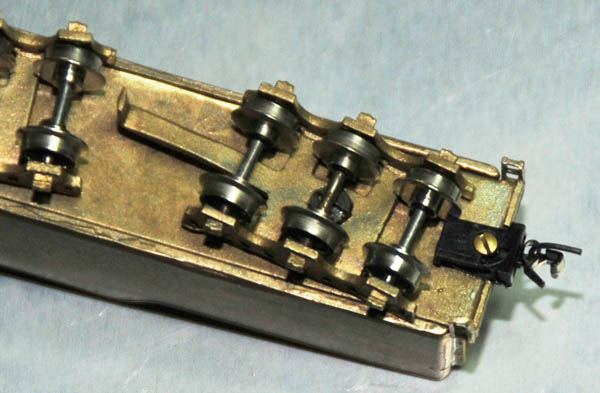
This is where you get to be a little creative. The photo shows a Westmodel steam tender, which has nothing more than a brass rod extending out of the rear truck to couple to Marklin fishhook-equipped rolling stock. But since most of my North American rolling stock uses MTL knuckle couplers that won't couple with the pin, I decided to install an MTL #905 knuckle coupler here.
So far, all of the coupler conversions in this article have dealt with locomotives and rolling stock with couplers already already installed, so all that was needed was to to find the right parts for the job. But what if you need to install a coupler on a car that has no coupler mount to speak of?
The first step is to choose where and how to install the coupler. Now, the nice thing about MTL couplers -- both the knuckle variety and the Marklin-compatible fishhook -- is that they can mount to any flat surface with nothing more than a screw. This means that your job is essentially to find a flat spot at the correct height, drill a hole, and then sink in the new coupler. On the Westmodel tender, I had these options:
- Remove just the pin from the end of the brass rod and mount the MTL coupler on top of the rod with a single screw. Although this approach wouldn't have involved any major surgery -- apart from cutting off the pin and bending the rod to set the coupler at the right height -- it would've been ugly as sin. Pass.
- Shorten the brass rod considerably and mount an MTL #905 to it so that it's somewhat tucked under the rear of the car. This would've also gotten me a truck-mounted coupler, but I would've had to trim much of the rear deck away. Again, pass.
- Replace the Westmodel brass trucks completely with MTL coupler-equipped trucks. While this is the best option for some models (particularly those without decent trucks to begin with), I didn't want to lose the sweet 3-axle trucks that are better-suited to the tender. Plus, I would've likely had to cut most of the deck away as well. No way.
- Do away with the pin and rod entirely from the rear truck and mount the coupler on the chassis. Normally, I'm not enamored with chassis-mounted couplers because of the compromise in automatic coupling, but this is a short car with minimal overhang. Plus, it'll be more prototypically accurate, and won't involve too much surgery to the rear of the tender. The sticking point is that there may be interference with the pivoting trucks, and the coupler screw will stick through an exposed portion of the rear deck.
Alas, I ended up going with the last option: a chassis-mounted coupler, and I'm pleased with the result. Here's how you do it:
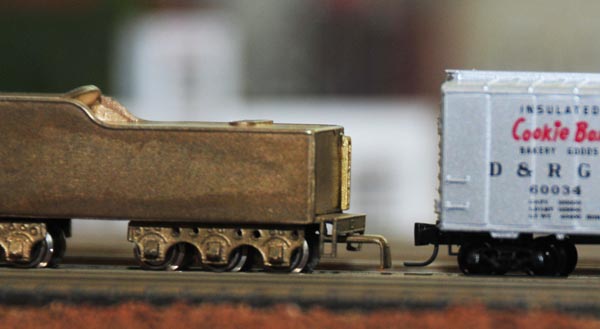
First, determine the ideal height for the coupler by placing the car on rails adjacent to a reference car. It's fairly clear from this photo that the top of the coupler box on the hopper is in line with the underside of the tender chassis. Perfect!
Tip: take digital photos of your own project and use them for reference so you don't have to repeatedly reassemble and return to the rails to re-measure.
Next, find a small-radius curve and see how much the trucks need to pivot to negotiate the turn.
Longer cars and locomotives will require more pivot room than shorter cars. Luckily, this tender is short, which means only a small pivot, and thus room to install the coupler box between the flanges on the rear-most wheels. You'll see where this comes into play in the next step and in step #7.
Flip the chassis over and test-fit the coupler. The coupler must be far enough out to permit unobstructed coupling with other cars, even on curves. It also must clear the rear truck and wheel flanges, so the rear truck can pivot freely. But the further out the coupler sticks, the worse it looks, and the greater the overhang (which can cause coupling problems). You've also got to ensure the screw hole isn't too close to the edge. (I wanted the hole hidden and the coupler housing flush with the rear deck, but no such luck here.)
When you've found the ideal spot, mark the position of the screw hole with a fine-point Sharpie pen.
Tip: the MTL coupler housing isn't exactly symmetrical, but the mounting hole is dead center. Once you've marked the approximate position of the hole, use digital calipers to make sure it's perfectly centered.
- If necessary, cut away parts of the chassis that would interfere with installation or operation. On the Westmodel tender, I had to trim a notch out of the overhang on the rear deck (shown in this photo). Again, use digital calipers to make sure the notch is centered.
The Micro-Trains #903 / #905 coupler comes with 00-90 mounting screws (size #00, 90 threads-per-inch). You can use a #62 drill bit (0.038" / 0.965mm), which comes with the MTL #1059 set described in the next step. Don't use anything larger than a #61 drill bit (0.039" / 0.991mm), though; the last thing you want is too big of a hole. If anything, play it safe and start with an even smaller drill and slowly enlarge the hole until the tap fits.
Tip: twist drill bits tend to "skate" across metal surfaces, which (apart from scarring the chassis) makes it difficult to get a hole precisely where you want it. To prevent this, score the chassis by twisting the tip of a sharp X-acto knife (like you're turning a small screwdriver). I also find it helpful to clamp the drill (a Dremel tool in this case) to my bench and manipulate the part with my hands.
- With the hole drilled, the next step is to to tap it to add the threads. I do not recommend trying to use one of the coupler screws to tap the hole. For one, it's not a self-tapping screw; its threads are too fine and you'll just end up ruining the hole (and probably the screw). Also, these tiny screws are too soft to tap the brass deck on this tender.
You'll need an proper 00-90 tap, which is included in MTL's own drill-and-tap set (#1059, part 988 00 121) - you also get a #62 drill bit to make the tapped hole and a (larger) #56 drill to cut a clearance hole. You can also get the tap separately as the Hob-Bits H895.
Just mount the tap in a mandrel or tap handle and then carefully and slowly twist it into the hole, making sure to keep it straight and true (perpendicular to the surface).
Install the coupler. Be careful not to over-tighten the screw, lest you strip the threads and crush the coupler.
Pivot the truck and see if it hits the coupler. As you can see in this photo, the truck easily pivots to the angle required by the tightest turn (determined in step #2).
Note: not wanting to commit to the new coupler until I found it was a success, I didn't cut the rod and pin off the rear truck, but rather only turned the truck 180º. Since there's room, I may leave the rod in place.
Now for the moment of truth: place it on the rails and try coupling with another car. Success!
Tip: coupler height is extremely important. If your newly-installed coupler doesn't perfectly line up with couplers on other cars, it won't stay coupled as it pulls a train around your track. If needed, add a thin shim and a slightly longer screw to lower the coupler. Or, to raise it, carve out a shallow pocket in the bottom of your car. Luckily, no such adjustments were needed here.
But there's still that pesky screw sticking up through the deck on the tender. No matter: briefly grind the joint with a Dremel #425 polishing wheel (mounted on a Dremel #402 mandrel) to smooth it out to the point where it should be completely hidden when painted.
Installing Micro-Trains Trucks On Marklin Rolling Stock
You've probably noticed that the trucks on Marklin boxcars, gondolas, cabooses, and tank cars are much too large and thus located too far from the ends of the cars to look realistic.To make Marklin US rolling stock look more prototypically accurate, you'll need to remove the Marklin couplers and trucks, drill new holes, cut new bolster pins, and mount Micro-Trains couplers and trucks. Harald Freudenreich has provided some excellent instructions for this conversion on his website.
Another solution is to install a special "center sill" from The Zelatory on your Marklin car, allowing easy installation of Micro-Trains trucks.
Assembling & Repairing MTL Couplers
Ready for some fun? You're going to use all five of your hands to assemble plastic and metal parts the size of hydrogen atoms into a self-contained mechanism that will provide trouble-free operation for years to come. Or, at least you'll try.
Before you begin, I strongly recommend you pick yourself up a Micro-Trains #702 assembly fixture (part # 988 00 191), which really does a nice job of holding everything together as you complete assembly. I've done this with and without the 702, and I'll never, EVER do without again. It's cheap and dead simple to use, so in writing these instructions, I assume you have one handy.
 On to orientation: open this diagram and follow along from bottom to top:
The Micro-Trains #903 kit has all the parts you need to assemble a functional coupler; the Micro-Trains #905 is the same coupler sold fully-assembled. Buy the #903 to save a few bucks, get spare parts for repairs, or repair a truck-mounted coupler. Buy the #905 to save your sanity.
Here's how to assemble a Micro-Trains knuckle coupler from just the parts, either from a #903 kit or from a wounded coupler you've taken apart to fix:
 Place the coupler housing open-side up onto the 702 jig, with the coupler's mouth facing towards the spring-loaded clamp.
The large pin on the fixture should pierce the main hole in the coupler housing, as shown in this photo.
Place the coupler housing open-side up onto the 702 jig, with the coupler's mouth facing towards the spring-loaded clamp.
The large pin on the fixture should pierce the main hole in the coupler housing, as shown in this photo.
Tip: Not sure how to orient everything? Pretend you're Fonzie and give a thumbs-up with your right hand. (Vocalize a cool "Aaay" if that helps you.) Orient the knuckle half of the coupler just like the fingers on your right hand. The thin end of the trip pin should be pointing in the same direction as your right thumb as you insert it through the bottom of the knuckle. When fully inserted, the trip pin should then look like an extended pinky finger as though you were sipping tea. Consult the diagram for further help.
 Using fine tweezers to hold the two halves together like this, place them over the pin on the fixture so that the trip pin falls neatly in the triangular gap, and the knuckle points toward the fixture clamp.
Tip: truck-mounted couplers use a different housing than the standalone #903 / #905, explained in the orientation.
This means that when you place the knuckle assembly into this sort of housing, the trip pin points up rather than hiding in the triangular gap of the #702 jig.
As a result, the pin may interfere with the #702's spring-loaded clamp.
To fix the problem, mark the point where the trip pin hits the clamp, and then drill a small hole into the face of the clamp to accommodate the pin.
(Or, dispense with the clamp and use pair of locking tweezers to hold everything together instead.)
 Slowly release the fixture clamp so that it presses against the coupler, pushing the knuckle and lip firmly against the pin, as shown in this photo.
(This is where the 702 jig really earns its keep.)
Slowly release the fixture clamp so that it presses against the coupler, pushing the knuckle and lip firmly against the pin, as shown in this photo.
(This is where the 702 jig really earns its keep.)
 With the knuckle assembly held in place by the clamp, grab a spring with a fine pair of tweezers (or even the tip of an X-acto knife), and insert it into the space between the large pin and the rear of the knuckle/lip parts.
First put one half the spring in, then compress the spring to get the rest of it in place.
With the knuckle assembly held in place by the clamp, grab a spring with a fine pair of tweezers (or even the tip of an X-acto knife), and insert it into the space between the large pin and the rear of the knuckle/lip parts.
First put one half the spring in, then compress the spring to get the rest of it in place.
Tip: springs have minds of their own.
They jump and hide, never to see the light of day again.
To prevent yours from disappearing, insert a piece of fine thread through the spring while working with it, and then carefully pull it out when assembly is complete.
 Before the spring has a chance to leap out, use your tweezers to place the cover over the mechanism, and press it into place.
Tip: if you're working on a damaged or worn coupler, you may find the tiny studs on the housing that hold the cover in place no longer work. A tiny bit of CA glue on the three or four key spots will keep the cover fastened. (By "tiny," I mean tiny: use the point of a pin or tip of an X-acto knife to tab it. Any more than that, and it will seep inside and cause the mechanism to seize up.)
So, what happens if you need to repair a Micro-Trains coupler? Well, you have a few options:
 Regardless of the type, you can take the broken coupler apart and then reassemble it, replacing any broken parts with spares salvaged from earlier wrecks or taken from a new #903 kit.
This last option saves money, but takes a steady hand.
Regardless of the type, you can take the broken coupler apart and then reassemble it, replacing any broken parts with spares salvaged from earlier wrecks or taken from a new #903 kit.
This last option saves money, but takes a steady hand.
Tip: see Staying Coupled for ways to improve the grip of MTL knuckle couplers and reduce the slinky effect. See also Stop Turnout & Double-Slip Switch Derailing if your MTL cars with truck-mounted couplers are derailing on Marklin turnouts.
Guide to MTL Couplers and Trucks
Here are the different kinds of couplers and trucks Micro-Trains makes. Except for the #901, #902, and #949, all of the trucks and couplers are interchangeable (that is, they all share the same mount).
| Item |
Description | Picture | Assembled? | # Included |
| 901 |
Medium-shank knuckle couplers for use with Marklin locomotives and rolling stock | 2 pair | ||
| 902 |
Short-shank knuckle couplers for use with Marklin locomotives and rolling stock | 2 pair | ||
| 903 |
Standard knuckle couplers for use with MTL locomotives and rolling stock | 2 pair | ||
| 905 |
Same as 903, but come pre-assembled | 2 pair | ||
| 907 |
Marklin-style fishhook couplers for use on MTL rolling stock with truck-mounted couplers | 3 pair | ||
| 908 |
Marklin-style fishhook couplers for use on MTL rolling stock with chassis-mounted couplers & F7 locomotives | 2 pair | ||
| 951 |
"Bettendorf" style trucks (no couplers) | 1 pair | ||
| 954 |
"Bettendorf" style trucks with couplers (available in black and brown) |
1 pair | ||
| 952 |
"Archbar" style trucks (no couplers) | 1 pair | ||
| 955 |
"Archbar" style trucks with couplers (available in black and brown) |
1 pair | ||
| 953 |
"Roller Bearing" style trucks (no couplers) | 1 pair | ||
| 956 |
"Roller Bearing" style trucks with couplers (available in black and brown) |
1 pair | ||
| 970 |
"Andrews" style trucks (no couplers) | 1 pair | ||
| 971 |
"Andrews" style trucks with couplers (available in black and brown) |
1 pair | ||
| "Barber Roller Bearing" style trucks with couplers | 1 pair | |||
| 961 |
"Diamond Archbar" style trucks (no couplers) | 1 pair | ||
| 962 |
"Barber Coleman Archbar" style trucks (no couplers) | 1 pair | ||
| 959 |
Passenger coach trucks with MTL couplers (available in silver and black) |
1 pair | ||
| 959 |
Passenger coach trucks with Marklin-style couplers (available in silver and black) |
1 pair | ||
| 904 |
Passenger coach trucks (no couplers) (old style, infrequently used) |
1 pair | ||
| 949 |
Locomotive truck side-frames with couplers, for use with the F7A, F7B, GP38, & GP9 | 1 pair | ||
| 950 |
33"-diameter wheelsets (available in black and brown) |
1 dozen | ||
| 957 |
36"-diameter wheelsets | 1 dozen | ||
| 915 |
Coiled centering spring for #903 and #905 couplers | 1 dozen | ||
| 916 |
Coiled centering spring for #901 and #902 couplers | 1 dozen | ||
| Bolster Pin, Flat (for trucks with couplers) | 1 pair | |||
| Bolster Pin, Round (for trucks without couplers) | 1 pair | |||
The different freight truck styles offered by Micro-Trains differ only in their appearance; the one you choose is simply a matter of historical accuracy. (Thanks to Micro-Trains for some of the historical info.)
 Bettendorf
Bettendorf trucks were the most widely used during the first 50 years of the 20th century, appearing on steel boxcars into the 1970s and wood boxcars into the 1960s. (Photo of the real thing at Wikipedia.)ArchbarNote: Both Full Throttle and AZL also make Bettendorf trucks - see Coupler Types for more information.
Archbar trucks were common on early double-sheathed wood box cars, flat cars, and reefers, but were completely phased out by the end of the steam era (circa 1938). (Photo of the real thing at Wikipedia.)Roller Bearing
Roller bearing trucks started appearing in the 1930s, became standard in 1956, and were required by the A.A.R. on all new cars starting in 1966 and rebuilt cars starting in 1970. By 1978, more than 70% of North American rolling stock was roller bearing equipped.AndrewsNote: AZL also makes a Roller bearing truck - see Coupler Types for more information.
A contemporary of both the Archbar and the Bettendorf trucks, its cast frame design was less prone to failure and allowed the use of expensive, serviceable journal boxes left-over from retired Archbar Trucks. The two main spotting features are the bolts that attach to the journal boxes and the tie-bars from the bottom of each journal box to the diagonal of the casting.
Most, if not all Micro-Trains boxcars come with Bettendorf trucks.
FR hoppers typically have Bettendorf trucks, and PennZee hoppers typically have Roller Bearing trucks.
E & D Models' 48ft spine car uses Roller Bearing trucks (1 pair #956 for the ends, and 2 pair #953 for the pivots).
Return Home | Search | Contact Me
Copyright © 2000-2011 D. A. Karp. All rights reserved.


