Review: Freudenreich Feinwerktechnik
|
While a large manufacturer like Marklin has the resources to routinely release comprehensive catalogs and distribute their products to retail stores around the world, the products of smaller manufacturers (such as this one) are much more difficult to learn about and acquire. So, I've posted these pages with photos, information, and the occasional critical eye to spread the word, so to speak. Contact information for this manufacturer is located here; see where to buy for additional information. Feel free to write me if you have any questions or additions to this page. |
Harald Freudenreich has released a whole bunch of locomotives and rolling stock for Z-scale. The quality is first-rate, and Harald is friendly and very responsive. He takes orders directly, and accepts credit cards.
I'm fortunate to have several of his products, and will be undoubtedly obtaining more as funds permit.
FR is the only manufacturer of which I am aware that sells kits for some of the rolling stock, which, in addition to making them more affordable, makes the experience that much more fun.
The instructions are all in German, but none of the kits I've seen so far are that complicated - I never read instructions anyway.
 Unlike most German manufactures, FR makes several American prototypes, all out of photo-etched brass.
This is a two-bay hopper lettered for the Frisco line; there are several others, including Peabody (below).
The detailing is excellent, and the paint job is first-rate.
It's a little heavier and more expensive than a Pennzee hopper, but it's much nicer.
 This is a two-bay hopper lettered for the Peabody line.
Both hoppers have Micro-Trains trucks and couplers.
The brake wheel could look more realistic, but it's ok. Perhaps a plastic wheel from a PennZee hopper or Micro-Trains boxcar would work here.
FR also makes some boxcab diesels, appropriate motive power for these hoppers.
There's also an absolutely beautiful Leigh Valley set with a locomotive and three cars: currently on my wish-list.
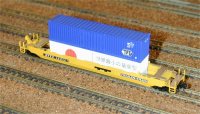 My latest FR acquisition is a set of the highly-anticipated, and totally unique Gunderson Husky-Stack container cars.
I purchased them as kits, and have put together full assembly instructions and photos.
This car is suitable rolling stock for use with the American Z Lines C44-9W.
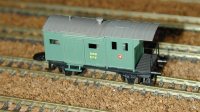 I purchased this Swiss caboose as a kit (the one you see pictured was built and decorated by yours truly).
The kit comes with all etched stainless steel parts (except for the brass roof details), and decals - it requires the plastic chassis of an 8609.
My paint job isn't bad here, although I think the color is a bit lighter than the prototype.
Note the detailing on the door and the roof.
The crooked decal is, of course, my fault...
 Also purchased as a kit, this Swiss gondola requires the chassis from a Marklin 8606 Banana car or an 8610 Gondola for construction (photo also shows model built and decorated by yours truly).
The parts are etched brass and stainless steel, and go together easily.
The best aspects of this model are the stainless steel mesh and the great "junk" load - it's a really neat little car.
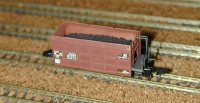 This Belgian hopper was the most difficult of the FR kits I've built, possibly because the chassis is also part of the kit (again, photo shows the unit I built).
The body and chassis are all made from etched brass parts; the load (some sort of cast material) is beautiful, and the wheels are blackened!
Again, my paint job isn't that great, but it was fun just the same.
My only modification was to glue two Marklin couplers and housings (taken from a broken 8606 Banana car) to the bottom of the chassis, rather than use the included MT Marklin-Style couplers, which suck.
I'd like to have a whole bunch of these nice-looking, unique little cars - if only I had a Belgian locomotive to pull them.
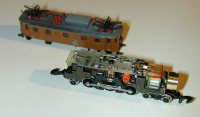 If you have a Marklin 8851 (Swiss Federal Railways class Ae 3/6II) or the 81418 set, I recommend the FR upgrade kit.
It adds a flywheel, large capacitor, and improved power pickup, all of which contribute to smoother operation.
The kit also adds constant lighting and a maintenance-free LED.
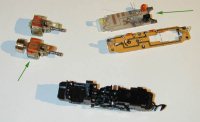 For about US$40.00, you get a new motor with a machined brass flywheel already attached and a new circuit board (the green arrows in the photo show the replacement parts).
The upgrade process took me about 20 minutes; here is what's involved:
First, remove the old circuit board and motor, as well as the two-wheeled truck (making it easier to do the next step).
 The only surgery required involves cutting away part of the frame, which is not as big of a deal as it seems.
I used a finger from a disposable latex glove to protect the frame and running gear.
About two minutes with a Dremel tool and a fiberglass cutting disk (Dremel #426) was all that was needed to remove the unwanted portion of the frame, which made room for the flywheel.
 Lastly, install the new motor and circuit board.
(The photo shows the unit before the new circuit board and the old truck were attached.)
The only snag I ran into was that the flywheel rubbed against the inside of the body (specifically against the light inserts and window inserts). Removal and a little massaging of these interior parts was necessary to get it the engine to run with the body attached.
There are a few drawbacks to this upgrade: only one side gets a light, and if you wish to use the overhead catenary to power the unit, you need to re-solder a connector on the circuit board (on the Marklin board, you just turn a small switch). Also, my upgrade kit came with a 3-pole motor (as opposed to one of Marklin's newer 5-pole motors), although newer kits may come with the newer motors.
After the upgrade, my 8851 ran much better - if you're not afraid to perform a little surgery on yours, you may want to consider it.
Return Home | Search | Contact Me
Copyright © 2000-2010 D. A. Karp. All rights reserved.