Replacing 3-Pole Motors with 5-Pole Motors
In 2000, Marklin introduced the 5-pole motor, which offered better performance than the 3-pole motor used in all Marklin Z-scale locomotives for the 28 previous years. At first, only a few select models were available with the improved powerplant. And since about the fourth quarter of 2000, the old 3-pole motor was phased out entirely.
Luckily, nearly all older locomotives can be easily retrofitted with the newer motors, which are available from any authorized Marklin dealer. What follows is everything you need to know about retrofitting a Marklin engine with a new five-pole motor.
In this article:
Related information:
I welcome any and all comments, additions, and corrections you wish to email me.
Click any photo to see more detail.
Do you Need a 5-Pole Motor?
Initial observations were based on the differences between new engines with 5-pole motors and old ones with 3-pole motors. I've since upgraded several old engines, and noticed even more substantial improvements.
5-pole motors are smoother, especially at low speeds, and tend to generate less noise than their 3-pole counterparts. Although a new 5-pole motor should outperform a 3-pole motor at full throttle, the best thing about the 5-pole motors is their low-speed performance. Example: I was able to get my 88431 (which came with a 5-pole motor) to move so slowly that it took 4 full seconds to move between two ties on Marklin track - that's about 0.9 mm/sec, or a scale speed of 0.71 kph (0.44 mph)! For many of my engines, that's enough of a reason to upgrade.
I've recently retrofitted my Orient Express, my Mikado (see below), my 8856 Crocodile, and my 8816 railbus, all with superb results. The Crocodile, which previously limped around my track, is now smooth and fast; and since its articulated design gives it terrific power pickup, it instantly has become one of my best running engines.
If some of your engines aren't running as well as they should, this is an easy, low-cost way to get a big performance gain. If, however, low-speed performance isn't that important to you, and your current locomotive(s) seem to be running well, then you might as well save your money for new rolling stock instead.
Note: some people have reported that their engines have become noisier after a 5-pole upgrade, especially steam engines. Most engines will become quieter after their motors and brushes have been broken in, so try running them around your track for a good 10-15 minutes without stopping. Also, make sure the gears and axles are lubricated (details).
How to Tell Which Motor You Have
There are two ways to tell if your locomotive has a three-pole or five-pole motor:
Take it apart
The easiest and most accurate method involves actually looking at your motor and counting the poles. The poles are simply the windings on the motor armature - you'll either see 3 or 5 windings.
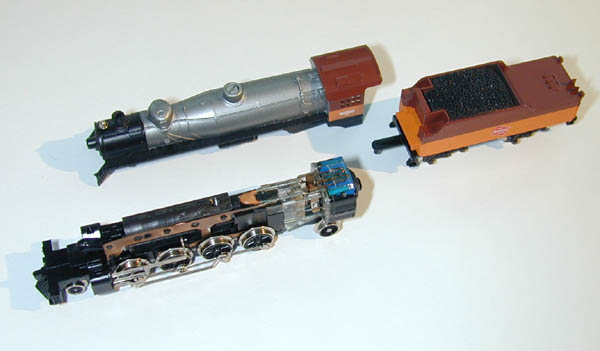
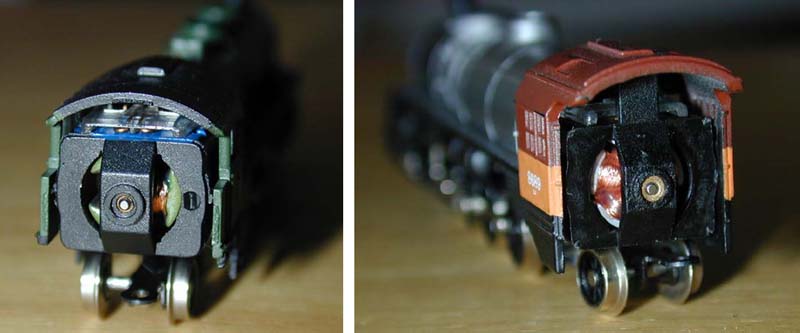
If you have a steam locomotive with the motor visible from the rear of the cab, just peer into the motor casing. In this photo, the green locomotive on the left has a three-pole motor, and the brown/orange locomotive on the right has a five-pole motor.
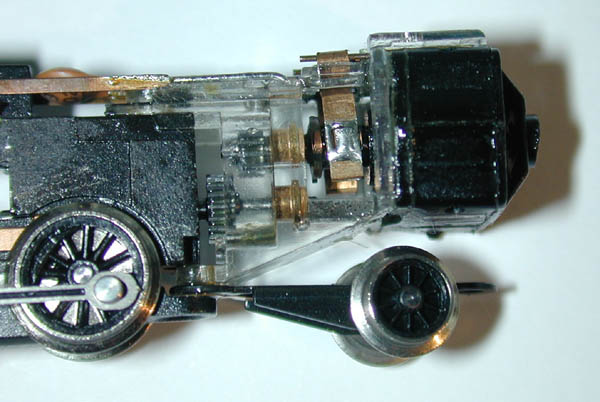
If the motor is not visible from the rear (as it is on all electrics and diesels, and many steam engines), you'll have to remove the shell to investigate. Details on taking apart all types of locomotives can be found at Cleaning and Lubricating Your Locomotive (on the "Reviving Marklin Locomotives" page). Once you've uncovered the motor, just count the windings (as shown in this photo).
Look it up
If you don't want to take apart your engine, or if you haven't purchased it yet, you can look up your locomotive model number in the table below. If there's a n/a in the 3-Pole Motor column, the engine was produced only with a five-pole motor. If there's a n/a in the 5-Pole Motor column, the engine was produced only with a three-pole motor.If there's a model number in both the 3-Pole Motor and 5-Pole Motor columns, the engine could come with either motor type. In this case, if the engine was purchased (or discontinued by Marklin) before 2000 and you know it wasn't upgraded, it definitely has a 3-pole motor. If it was purchased during or after 2000, it could have either type motor (depending on when your dealer purchased the unit).
Tip: if a particular model number isn't in this list, the engine was almost certainly produced after 2001. Now, Marklin's model numbers follow a pattern of sorts: those engines with 5-digit model numbers (e.g., 88841) are typically more-recent versions of engines sharing the first four digits (e.g., 8884). This means that your 88841 likely uses the same engine (and even chassis) as the older 8884, and moreover, that your 88841 was produced recently enough to already have a 5-pole motor.
Don't know the model number of your locomotive? Here are some tips to help you find out.
Upgrading Most Marklin Locomotives
Most locomotives can be upgraded from 3-pole to 5-pole motors with a simple drop-in replacement.
Just pop off the shell, remove the circuit board and transaxle mounts by unscrewing their retaining screws, and pull out the old motor. Then drop in the new motor and put it all back together. See Reviving Marklin Locomotives for disassebly instructions for most Marklin designs.
Things get a little trickier with steam locomotives: If you're upgrading a large steamer, see the next section, Retrofitting a Big Steam Locomotive. If you're upgrading a small 0-6-0 or 2-6-0 engine -- one with the motor armature pressed into the chassis -- see Retrofitting a Little Steam Locomotive later in this article.
Retrofitting a Big Steam Locomotive
The following simple process shows a motor retrofit in a Marklin Mikado locomotive. The whole process takes less than five minutes.
Note: these steps apply to larger steam locomotives only. The smallest ones (such as the 8800, 8805, & 8803) have motor armatures pressed into their chassis, so the procedure is different.
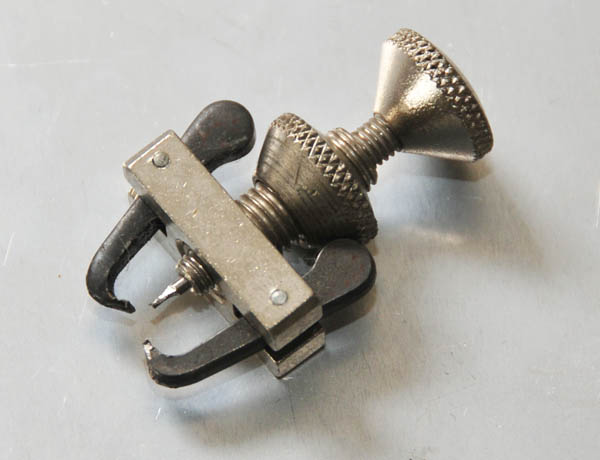
 First, remove the screw that holds the shell on the chassis, and lift off the shell.
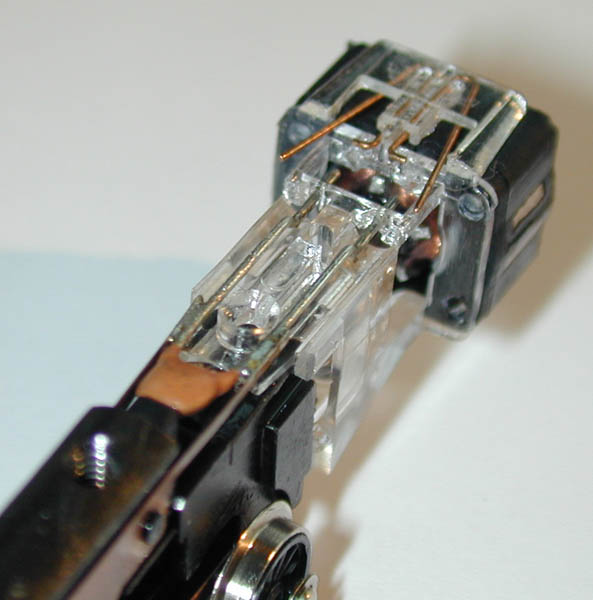
 Next, remove the capacitor in the new, five-pole motor by gently pulling it out.
The little copper springs, used to hold the two brushes in place, will snap outward.
Gently remove the brushes if they haven't fallen out.
(Note: the 5-pole brushes are different from the old 3-pole brushes, so make sure not to mix them up.)
Next, remove the capacitor in the new, five-pole motor by gently pulling it out.
The little copper springs, used to hold the two brushes in place, will snap outward.
Gently remove the brushes if they haven't fallen out.
(Note: the 5-pole brushes are different from the old 3-pole brushes, so make sure not to mix them up.)
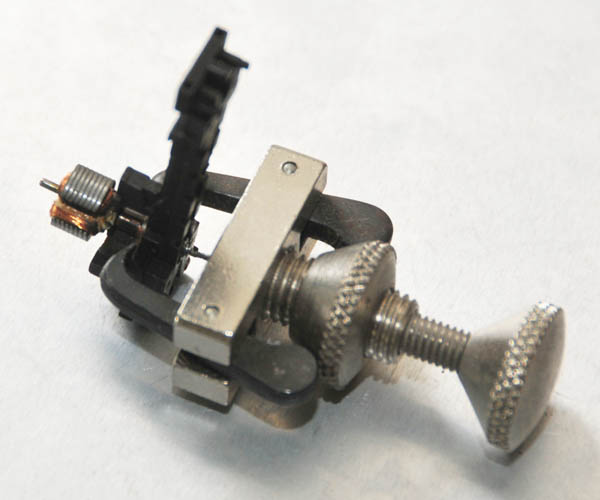
 Next, remove the upper motor screw, located between the two leads of the yellow capacitor; be careful not to break any of the leads.
Remove the lower motor screw, which usually holds the trailing wheelset or the tender coupler. If absolutely necessary, loosen the front belly pan screw slightly to remove the wheelset; it's not necessary to remove the pan completely (don't remove the front screw). Note: it's not necessary to remove the lower screw for engines with 5 driving axles (such as the 8884).
Important: Try not to turn the wheels, as doing this while the belly pan is loose may cause the gears to get jammed or even fall out.
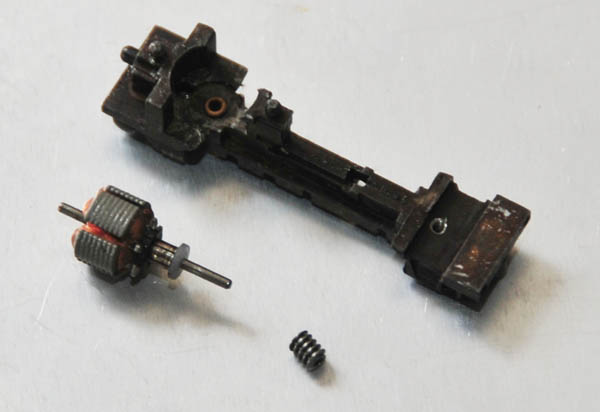
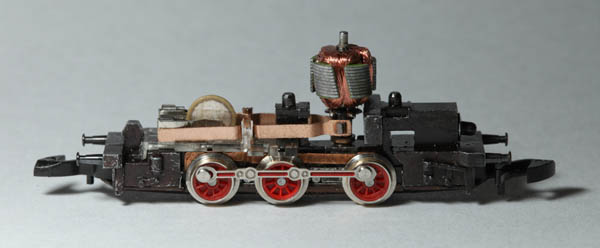
 This shows the motor and rear wheelset completely removed from the chassis.
Notice that the capacitor is still attached to the chassis.
This shows the motor and rear wheelset completely removed from the chassis.
Notice that the capacitor is still attached to the chassis.
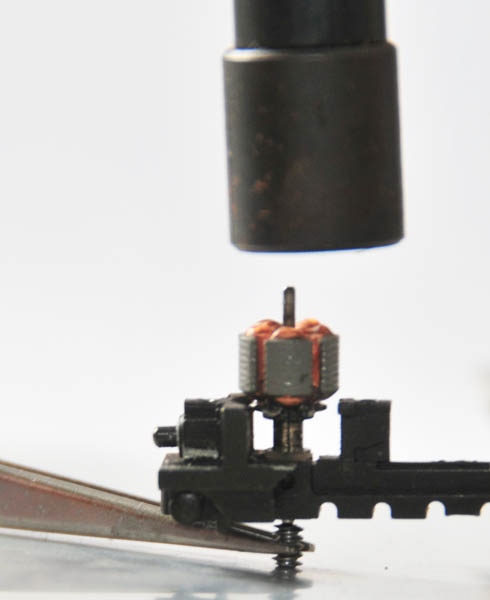
 Carefully slide the new motor into place, making sure the lower shaft (with the worm gear) slides into the brass bushing (as shown in this photo), and the spur gears mesh properly.
You may have to gently turn the motor armature to get the gears to mesh and the motor assembly to slide into place.
Carefully slide the new motor into place, making sure the lower shaft (with the worm gear) slides into the brass bushing (as shown in this photo), and the spur gears mesh properly.
You may have to gently turn the motor armature to get the gears to mesh and the motor assembly to slide into place.
Also, the two leads of the capacitor should slide into the two holes, as shown in the photo here.
There are actually two pairs of holes, located in front and behind the brush section - make sure the capacitor leads fit correctly into both.
 Once the motor is in place, put the trailing wheelset back in (if applicable), and gently tighten both screws.
The next step is to install the brushes. In the photo here, the brush on the right has been installed. The copper springs hold the brush against the two leads of the capacitor.
The easiest way to install a brush is to insert it with a pair of fine tweezers, and then, using the tweezers, pull the spring over the brush so that it snaps into place.
Look carefully at the photo for details.
If the engine appears to run louder than before, the new gear is probably not sufficiently lubricated (details). Note also that it may take a few runs around your layout for the engine to be broken in, after which it should be noticably quieter.
If it runs really rough, the gears are probably binding, and need to be re-set (details).
The transformation was remarkable. With the new five pole motor, it now runs quietly and smoothly; the low and high speed performance is much better, and I did it all for under 20 dollars!
Retrofitting a Little Steam Locomotive
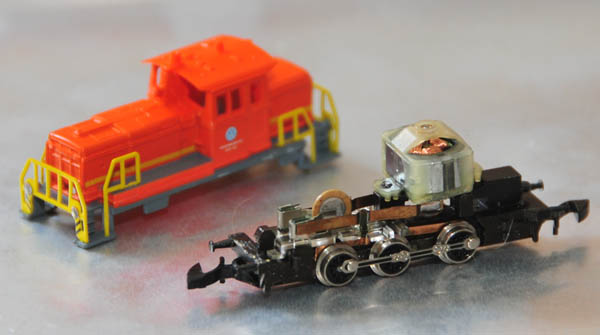 Marklin's smallest locomotives, such as the 0-6-0 steam engines (8800, 8805, 8138, 8150, 8165), the 2-6-0 steam engines (8801, 8895), and the 0-6-0 diesels (8804, 8864, 8865, 8134, 8176), all have vertically-mounted motors.
The armature shaft goes through a hole in the chassis and a worm gear is pressed onto the protruding end, which meshes directly with the drive wheel gears.
That friction-fit worm gear makes removal of the motor for upgrade a bit difficult, but not impossible.
Marklin's smallest locomotives, such as the 0-6-0 steam engines (8800, 8805, 8138, 8150, 8165), the 2-6-0 steam engines (8801, 8895), and the 0-6-0 diesels (8804, 8864, 8865, 8134, 8176), all have vertically-mounted motors.
The armature shaft goes through a hole in the chassis and a worm gear is pressed onto the protruding end, which meshes directly with the drive wheel gears.
That friction-fit worm gear makes removal of the motor for upgrade a bit difficult, but not impossible.
Here's how you do it:
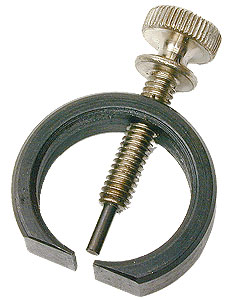
 The first thing you need is a nifty tool known as a gear puller.
An adjustable gear puller like the one by Mascot Precision Tools in this photo does the job nicely.
You can get it from your local hobby shop or (if necessary) from Amazon.com.
The first thing you need is a nifty tool known as a gear puller.
An adjustable gear puller like the one by Mascot Precision Tools in this photo does the job nicely.
You can get it from your local hobby shop or (if necessary) from Amazon.com.
Tip: the "adjustable" feature of a gear-puller is important, as you'll see below. Some tiny gear pullers aren't adjustable (like this one) and therefore won't shrink down small enough to grasp our tiny gears nor expand out far enough to fit over a locomotive chassis.
Note: the old brushes won't work with the new armature, so if you want to keep them, use a Sharpie pen to label them with a "3" before you put them away.
Tip: while it's not necessary to completely strip the chassis as I've done here, it'll make your job quite a bit easier if there aren't couplers and copper contacts hanging off your workpiece.
 Since the worm gear on the Marklin 0-6-0 chassis is recessed, you'll have a heck of a time trying to fit the gear puller's arms around it directly.
So, place the arms around the outside of the chassis, like this, so that they're on either side of the motor armature.
Gently close the outer knurled wheel until the arms close around the chassis, but don't tighten it - they just need to be in contact with the edges of the flat deck next to the motor.
Since the worm gear on the Marklin 0-6-0 chassis is recessed, you'll have a heck of a time trying to fit the gear puller's arms around it directly.
So, place the arms around the outside of the chassis, like this, so that they're on either side of the motor armature.
Gently close the outer knurled wheel until the arms close around the chassis, but don't tighten it - they just need to be in contact with the edges of the flat deck next to the motor.
 While slowly turning the inner knurled wheel clockwise, position the pin so that it enters the hole in the worm gear and is pressing against end of the armature shaft.
(If it's not centered, but rather pressed against the worm gear itself, the pin may break as you tighten.)
Continue turning the inner knurled wheel clockwise until you encounter resistance, and then check the arms and the pin to make sure everything is lined up.
While slowly turning the inner knurled wheel clockwise, position the pin so that it enters the hole in the worm gear and is pressing against end of the armature shaft.
(If it's not centered, but rather pressed against the worm gear itself, the pin may break as you tighten.)
Continue turning the inner knurled wheel clockwise until you encounter resistance, and then check the arms and the pin to make sure everything is lined up.
Then, while holding everything in line, continue turning the inner knurled wheel clockwise and watch it slowly eject the armature out of the top of the chassis. You'll encounter the most resistance at first, but then it'll get easier.
Important: don't lose the worm gear!
 With the old armature off the chassis, you're ready to install the 5-pole replacement.
Start by popping the new motor in the hole of the chassis.
With the old armature off the chassis, you're ready to install the 5-pole replacement.
Start by popping the new motor in the hole of the chassis.
If you're looking for part #209454, it reportedly has been discontinued but is still available at AJCKIDS.com at the time of this writing.
 Next, hold the worm gear in place against a hard (preferably metal) surface with a pair of locking tweezers, and hold the chassis / armature assembly above the worm gear like this.
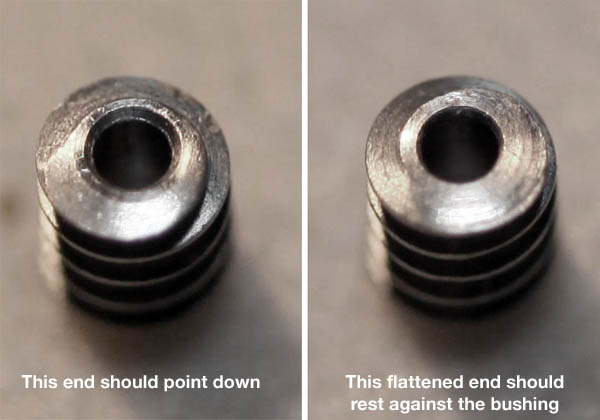
Important: These little worm gears are not totally symmetrical: one end is smooth and flat, while the other has more of a taper to the thread (as shown in this photo). Make sure the flat end rests against the bushing in the chassis and the tapered end points down, away from the chassis.
Ensure that everything is straight and true, and then gently tap the top of the armature with a small mallet to drive the shaft and worm gear together.
Tip: Take your time and repeatedly check to see the shaft is going in straight. Use a light touch with the mallet - too much of a whack may bend the armature shaft or shatter the worm gear.
Warning: If the chassis looks like it's going to bottom out, stop immediately. If the chassis touches the surface, the commutator will bare the brunt of your pounding. To prevent this from happening, you may need to flip the assembly over and gently tap the worm gear, perhaps with a small slotted screwdriver placed between the gear and your mallet to act as a buffer.
Keep going until there's very little slop left (the motor just barely slides up and down). The shaft shouldn't protrude through the end of the worm gear, and -- most importantly -- the armature should spin freely.
 When you're done installing the motor, install the new 5-pole brushes, put the locomotive back together, and give it a test spin.
(Photo shows a recently-upgraded engine with the newer helical-shaped armature.)
When you're done installing the motor, install the new 5-pole brushes, put the locomotive back together, and give it a test spin.
(Photo shows a recently-upgraded engine with the newer helical-shaped armature.)
Note: Some new motors have a bit of film on the commutator, preventing electrical conductivity with the brushes. If your engine won't run, remove the magnet housing and spin the armature (with the brushes in place) for a few minutes with your fingers to wear down the film and brush contacts, and then try again.
Ig Jakovac adds: "I found that slightly bending new brushes inward as to increase the contact pressure with armature helps initially to get loco moving. This one alone can make huge difference. Once brushes are broken in and engine runs smoothly, brushes can be straightened out to reduce the drag and extend the brush service life."
Tip: If it doesn't run smoothly, go through this checklist.
5-Pole Motor Upgrade Table
The following chart lists all (or nearly all) Z-scale locomotives Marklin produced (either sold separately or as part of a set) as of about 2002, and the corresponding model numbers for the appropriate 3-pole motor, 5-pole motor, and brushes. Many locomotives once sold with 3-pole motors are now being sold with 5-pole motors with no change to the model number; for other engines, Marklin merely incremented the fifth digit of the model number (e.g., 8805 to 88051). If you bought an engine recently and you're not sure which motor it came with, open it up and count the poles on the motor armature (details).
Note that the brushes used in 3-pole and 5-pole motors are similar, but not the same (the model numbers for 5-pole brushes end with a '1'). Most of the 5-pole motor upgrades listed below come with a pair of brushes pre-installed, as shown by the Brushes Included column (a n/a here means no upgrade is available). For those motors that don't have internally-mounted brushes, such as the 8816 and 8800/8805, you'll have to purchase the brushes separately.
An n/a in the 5-Pole Motor column means that no corresponding 5-pole motor is available. An n/a in the 3-Pole Motor column means that the locomotive was produced only with a 5-pole motor. (Note that upgrades are not possible for some engines, even though they have been produced with both 3 and 5-pole motors.) Unknown simply means that I don't have a part number yet.
Tip: Don't know the model number of your locomotive? Here are some tips to help you find out.
You can order these parts from any authorized Marklin dealer (see Where to Buy). Prices vary, but you should be able to find them for less than $25.00 apiece.
| Locomotive / Set | 3-Pole Motor | 5-Pole Motor | Brushes (3p/5p) | Brushes Included? |
| 8100 | 261900 | 211909 | 8989/89891 | yes |
| 8101 | 264440 | 211903 | 8989/89891 | yes |
| 8102 | 261900 | 211909 | 8989/89891 | yes |
| 8103 | 261520 | 209454(A) | 8987/89871 | yes/no(A) |
| 8104 | 261980(A) | 209454(A) | 8987/89871 | yes/no(A) |
| 8105 | 264440 | 211903 | 8989/89891 | yes |
| 8106 | 264440 | 211903 | 8989/89891 | yes |
| 8107 | 264440 | 211903 | 8989/89891 | yes |
| 8108 | 261900 | 211909 | 8989/89891 | yes |
| 8111 | 264440 | 211903 | 8989/89891 | yes |
| 8112 | n/a | 209452 | 8988/89881 | no |
| 8113 | 264440 | 211903 | 8989/89891 | yes |
| 8114 | 265500 | 211904 | 8989/89891 | yes |
| 8115 | 265860 | 211917 | 8989/89891 | yes |
| 8116 | 264440 | 211903 | 8989/89891 | yes |
| 8117 | 264440 | 211903 | 8989/89891 | yes |
| 8118 | 264440 | 211903 | 8989/89891 | yes |
| 8119 | 273520 | 211918 | 8989/89891 | yes |
| 8122 | 268200 | 211906 | 8989/89891 | yes |
| 8128 | 261920 | 211901(B) | 8988/89881 | no |
| 8130 | 267650 | n/a | 8989/89891 | yes |
| 8131 | 264440 | 211903 | 8989/89891 | yes |
| 8133 | 261900 | 211909 | 8989/89891 | yes |
| 8134 | 261520 | 209454(A) | 8987/89871 | yes/no(A) |
| 8135 | 261900 | 211909 | 8989/89891 | yes |
| 8137 | 264440 | 211903 | 8989/89891 | yes |
| 8139 | 262700 | 211911 | 8989/89891 | yes |
| 8140 | 261520 | 209454(A) | 8987/89871 | yes/no(A) |
| 8141 | 261520 | 209454(A) | 8987/89871 | yes/no(A) |
| 81411 | 264440 | 211903 | 8989/89891 | yes |
| 81412 | 264440 | 211903 | 8989/89891 | yes |
| 81413 | 261920 | 211901(B) | 8988/89881 | no |
| 81415 | 268850 | 211915 | 8989/89891 | yes |
| 81416 | 265860 | 211917 | 8989/89891 | yes |
| 81417 | 265860 | 211917 | 8989/89891 | yes |
| 81418 | 268000 | unknown | 8989/89891 | yes |
| 81419 | n/a | unknown | 8989/89891 | n/a |
| 81420 | n/a | unknown | 8989/89891 | yes |
| 8144 | 261520 | 209454(A) | 8987/89871 | yes/no(A) |
| 8145 | 273520 | 211918 | 8989/89891 | yes |
| 81460 | 264440 | 211903 | 8989/89891 | yes |
| 81461 | n/a | 211911 | 8989/89891 | yes |
| 81465 | 264440 | 211903 | 8989/89891 | yes |
| 81466 | n/a | 211911 | 8989/89891 | yes |
| 8150 | 279730 | n/a | 8987/89871 | n/a |
| 81520 | n/a | unknown | 8987/89871 | n/a |
| 8154 | 268850 | 211915 | 8989/89891 | yes |
| 8155 | 264440 | 211903 | 8989/89891 | yes |
| 81560 | n/a | 261980(A) | 8987/89871 | n/a |
| 81561 | n/a | 261980(A) | 8987/89871 | n/a |
| 81562 | n/a | 261980(A) | 8987/89871 | n/a |
| 81563 | n/a | 211909 | 8989/89891 | yes |
| 81565 | n/a | 261980(A) | 8987/89871 | n/a |
| 8158 | 261980(A) | 209454(A) | 8987/89871 | yes/no(A) |
| 8160 | 261980(A) | 209454(A) | 8987/89871 | yes/no(A) |
| 8163 | 279730 | n/a | 8987/89871 | n/a |
| 8165 | 279730 | n/a | 8987/89871 | n/a |
| 8167 | 279730 | n/a | 8987/89871 | n/a |
| 8168 | 264440 | 211903 | 8989/89891 | yes |
| 8170 | 261520 | 209454(A) | 8987/89871 | yes/no(A) |
| 8172 | 261520 | 209454(A) | 8987/89871 | yes/no(A) |
| 8177 | 279730 | n/a | 8987/89871 | n/a |
| 81780 | 262700 | 211911 | 8989/89891 | yes |
| 8180 | 261520 | 209454(A) | 8987/89871 | yes/no(A) |
| 8185 | 264440 | 211903 | 8989/89891 | yes |
| 81860 | 264440 | 211903 | 8989/89891 | yes |
| 81861 | 264440 | 211903 | 8989/89891 | yes |
| 8188 | 264440 | 211903 | 8989/89891 | yes |
| 8189 | 264440 | 211903 | 8989/89891 | yes |
| 8800 | 279730 | 209454(A) | 8987/89871 | yes/no(A) |
| 8801 | 261980(A) | 209454(A) | 8987/89871 | yes/no(A) |
| 8802 | 262070 | 209452 | 8988/89881 | no |
| 88021 | n/a | 209452 | 8988/89881 | no |
| 8803 | 261980(A) | 209454(A) | 8987/89871 | yes/no(A) |
| 8804 | 261520 | 209454(A) | 8987/89871 | yes/no(A) |
| 8805 | 279730 | 209454(A) | 8987/89871 | yes/no(A) |
| 88051 | n/a | 209454(A) | 8987/89871 | yes/no(A) |
| 8806 | 273520 | 211918 | 8989/89891 | yes |
| 88061 | 273520 | 211918 | 8989/89891 | yes |
| 88065 | n/a | 211918 | 8989/89891 | yes |
| 8807 | 262700 | 211911 | 8989/89891 | yes |
| 8808 | 262700 | 211911 | 8989/89891 | yes |
| 8809 | 264440 | 211903 | 8989/89891 | yes |
| 8810 | 262700 | 211909 | 8989/89891 | yes |
| 8811 | 265800 | 211905 | 8989/89891 | yes |
| 88111 | n/a | 211905 | 8989/89891 | yes |
| 8812 | 268200 | 211906 | 8989/89891 | yes |
| 8813 | 265800 | 211905 | 8989/89891 | yes |
| 8814 | 273520 | 211918 | 8989/89891 | yes |
| 8816 | 262070 | 209452 | 8988/89881 | no |
| 88161 | 262070 | 209452 | 8988/89881 | no |
| 88162 | 262070 | 209452 | 8988/89881 | no |
| 88163 | n/a | 209452 | 8988/89881 | no |
| 88175 | 262070 | 209452 | 8988/89881 | no |
| 88180 | 261900 | 211909 | 8989/89891 | yes |
| 88181 | 261900 | 211909 | 8989/89891 | yes |
| 88183 | 261900 | 211909 | 8989/89891 | yes |
| 8819 | 446840 | 211903 | 8989/89891 | yes |
| 8820 | 264440 | 211903 | 8989/89891 | yes |
| 8821 | 264440 | 211903 | 8989/89891 | yes |
| 8822 | 268200 | 211906 | 8989/89891 | yes |
| 88221 | 268200 | 211906 | 8989/89891 | yes |
| 88222 | n/a | 211906 | 8989/89891 | yes |
| 8823 | 264440 | 211903 | 8989/89891 | yes |
| 8824 | 268200 | 211906 | 8989/89891 | yes |
| 8825 | 265800 | 211905 | 8989/89891 | yes |
| 8826 | 261920 | 211901(B) | 8988/89881 | no |
| 8827 | 262700 | 211911 | 8989/89891 | yes |
| 88271 | 262700 | 211911 | 8989/89891 | yes |
| 8829 | 261920 | 211901(B) | 8988/89881 | no |
| 8831 | 262070 | 209452 | 8988/89881 | no |
| 8832 | 446840 | 211903 | 8989/89891 | yes |
| 8833 | 264440 | 211903 | 8989/89891 | yes |
| 8834 | 264440 | 211903 | 8989/89891 | yes |
| 8835 | 264440 | 211903 | 8989/89891 | yes |
| 8836 | 261900 | 211909 | 8989/89891 | yes |
| 88361 | 261900 | 211909 | 8989/89891 | yes |
| 8837 | 264440 | 211903 | 8989/89891 | yes |
| 88371 | 264440 | 211903 | 8989/89891 | yes |
| 8838 | 264440 | 211903 | 8989/89891 | yes |
| 88381 | 264440 | 211903 | 8989/89891 | yes |
| 8839 | 264440 | 211903 | 8989/89891 | yes |
| 88391 | 264440 | 211903 | 8989/89891 | yes |
| 8840 | 264440 | 211903 | 8989/89891 | yes |
| 88401 | 264440 | 211903 | 8989/89891 | yes |
| 8841 | 264440 | 211903 | 8989/89891 | yes |
| 8842 | 264440 | 211903 | 8989/89891 | yes |
| 8843 | 264440 | 211903 | 8989/89891 | yes |
| 88431 | n/a | 211903 | 8989/89891 | yes |
| 88432 | n/a | 211903 | 8989/89891 | yes |
| 88441 | 264440 | 211903 | 8989/89891 | yes |
| 88442 | 264440 | 211903 | 8989/89891 | yes |
| 88443 | 264440 | 211903 | 8989/89891 | yes |
| 88444 | 264440 | 211903 | 8989/89891 | yes |
| 88445 | 264440 | 211903 | 8989/89891 | yes |
| 88446 | 264440 | 211903 | 8989/89891 | yes |
| 88447 | 264440 | 211903 | 8989/89891 | yes |
| 88448 | 264440 | 211903 | 8989/89891 | yes |
| 88449 | 264440 | 211903 | 8989/89891 | yes |
| 88450 | 264440 | 211903 | 8989/89891 | yes |
| 88451 | 264440 | 211903 | 8989/89891 | yes |
| 88453 | 264440 | 211903 | 8989/89891 | yes |
| 88454 | n/a | 211903 | 8989/89891 | yes |
| 88455 | n/a | 211903 | 8989/89891 | yes |
| 88456 | n/a | 211903 | 8989/89891 | yes |
| 88457 | n/a | 211903 | 8989/89891 | yes |
| 88458 | n/a | 211903 | 8989/89891 | yes |
| 88459 | n/a | 211903 | 8989/89891 | yes |
| 8846 | 264440 | 211903 | 8989/89891 | yes |
| 8847 | 264440 | 211903 | 8989/89891 | yes |
| 88471 | 264440 | 211903 | 8989/89891 | yes |
| 88472 | 264440 | 211903 | 8989/89891 | yes |
| 88473 | 264440 | 211903 | 8989/89891 | yes |
| 88474 | 264440 | 211903 | 8989/89891 | yes |
| 88475 | 264440 | 211903 | 8989/89891 | yes |
| 88476 | 264440 | 211903 | 8989/89891 | yes |
| 8848 | 264440 | 211903 | 8989/89891 | yes |
| 8849 | 261920 | 211901(B) | 8988/89881 | no |
| 8850 | 261920 | 211901(B) | 8988/89881 | no |
| 8851 | 268000 | unknown | 8989/89891 | yes |
| 8852 | 265500 | 211904 | 8989/89891 | yes |
| 8853 | 264440 | 211903 | 8989/89891 | yes |
| 88531 | 264440 | 211903 | 8989/89891 | yes |
| 88532 | 264440 | 211903 | 8989/89891 | yes |
| 88533 | 264440 | 211903 | 8989/89891 | yes |
| 88534 | 264440 | 211903 | 8989/89891 | yes |
| 88535 | n/a | 211903 | 8989/89891 | yes |
| 88536 | n/a | 211903 | 8989/89891 | yes |
| 8854 | 261920 | 211901(B) | 8988/89881 | no |
| 8855 | 264440 | 211903 | 8989/89891 | yes |
| 8856 | 265500 | 211904 | 8989/89891 | yes |
| 8857 | 261920 | 211901(B) | 8988/89881 | no |
| 88571 | 261920 | 211901(B) | 8988/89881 | no |
| 88572 | 261920 | 211901(B) | 8988/89881 | no |
| 8858 | 261920 | 211901(B) | 8988/89881 | no |
| 8860 | 264440 | 211903 | 8989/89891 | yes |
| 88601 | 264440 | 211903 | 8989/89891 | yes |
| 88602 | 264440 | 211903 | 8989/89891 | yes |
| 88603 | n/a | 211903 | 8989/89891 | yes |
| 8861 | 264440 | 211903 | 8989/89891 | yes |
| 8862 | 264440 | 211903 | 8989/89891 | yes |
| 8863 | 264440 | 211903 | 8989/89891 | yes |
| 8864 | 261520 | 209454(A) | 8987/89871 | yes/no(A) |
| 88641 | 261520 | 209454(A) | 8987/89871 | yes/no(A) |
| 88642 | 261520 | 209454(A) | 8987/89871 | yes/no(A) |
| 88643 | 261520 | 209454(A) | 8987/89871 | yes/no(A) |
| 8865 | 261520 | 209454(A) | 8987/89871 | yes/no(A) |
| 8866 | 264440 | 211903 | 8989/89891 | yes |
| 8867 | 261920 | 211901(B) | 8988/89881 | no |
| 88680 | 264440 | 211903 | 8989/89891 | yes |
| 88681 | n/a | 211903 | 8989/89891 | yes |
| 88682 | 264440 | 211903 | 8989/89891 | yes |
| 88682 | n/a | 211903 | 8989/89891 | yes |
| 8870 | 261900 | 211909 | 8989/89891 | yes |
| 8871 | 269530 | 211907 | 8989/89891 | yes |
| 88711 | 269530 | 211907 | 8989/89891 | yes |
| 88712 | 446840 | 211903 | 8989/89891 | yes |
| 8873 | 446840 | 211903 | 8989/89891 | yes |
| 88731 | 446840 | 211903 | 8989/89891 | yes |
| 88732 | n/a | 211903 | 8989/89891 | yes |
| 8874 | 261920 | 211901(B) | 8988/89881 | no |
| 8875 | 261920 | 211901(B) | 8988/89881 | no |
| 8876 | 267240 | n/a | 8989/89891 | yes |
| 8878 | 264440 | 211903 | 8989/89891 | yes |
| 88781 | 264440 | 211903 | 8989/89891 | yes |
| 8879 | 264440 | 211903 | 8989/89891 | yes |
| 8880 | 264440 | 211903 | 8989/89891 | yes |
| 88807 | 262700 | 211911 | 8989/89891 | yes |
| 8881 | 261900 | 211909 | 8989/89891 | yes |
| 8882 | 261900 | 211909 | 8989/89891 | yes |
| 88820 | 261900 | 211909 | 8989/89891 | yes |
| 8883 | 268850 | 211915 | 8989/89891 | yes |
| 88831 | 268850 | 211915 | 8989/89891 | yes |
| 88832 | 268850 | 211915 | 8989/89891 | yes |
| 88833 | 268850 | 211915 | 8989/89891 | yes |
| 88834 | 268850 | 211915 | 8989/89891 | yes |
| 88835 | 268850 | 211915 | 8989/89891 | yes |
| 8884 | 268850 | 211915 | 8989/89891 | yes |
| 8885 | 261900 | 211909 | 8989/89891 | yes |
| 8886 | 261900 | 211909 | 8989/89891 | yes |
| 88861 | 261900 | 211909 | 8989/89891 | yes |
| 8887.1 | 279730 | n/a | 8987/89871 | n/a |
| 8887.2 | 262700 | 211911 | 8989/89891 | yes |
| 8887.3 | 268200 | 211906 | 8989/89891 | yes |
| 8888 | 261900 | 211909 | 8989/89891 | yes |
| 88885 | n/a | unknown | 8989/89891 | yes |
| 88886 | n/a | unknown | 8989/89891 | yes |
| 8889 | 261900 | 211909 | 8989/89891 | yes |
| 88891 | 261900 | 211909 | 8989/89891 | yes |
| 88892 | n/a | 211909 | 8989/89891 | yes |
| 8890 | 261900 | 211909 | 8989/89891 | yes |
| 8891 | 261900 | 211909 | 8989/89891 | yes |
| 8892 | 261900 | 211909 | 8989/89891 | yes |
| 88921 | n/a | 211909 | 8989/89891 | yes |
| 8893 | 261900 | 211909 | 8989/89891 | yes |
| 8894 | 261980(A) | 209454(A) | 8987/89871 | yes/no(A) |
| 8895 | 261980(A) | 209454(A) | 8987/89871 | yes/no(A) |
| 8896 | 265860 | 211917 | 8989/89891 | yes |
| 88961 | 265860 | 211917 | 8989/89891 | yes |
| 8897 | 261980(A) | 209454(A) | 8987/89871 | yes/no(A) |
| 88980 | 268850 | 211915 | 8989/89891 | yes |
| 88981 | 268850 | 211915 | 8989/89891 | yes |
| 88982 | n/a | 211915 | 8989/89891 | yes |
| 8899 | 267650 | 211912(C) | 8989/89891 | yes |
| 88991 | 267650 | 211912(C) | 8989/89891 | yes |
| 8900 | 279730 | n/a | 8987/89871 | n/a |
| 8901 | 261920 | 211901(B) | 8988/89881 | no |
| 8907 | 279730 | n/a | 8987/89871 | n/a |
| 8909 | 279730 | n/a | 8987/89871 | n/a |
| 8994 | 427360 | 211916 | 8989/89891 | yes |
| 8998 | 428610 | 211914 | 8989/89891 | yes |
| 90701 | 268850 | 211915 | 8989/89891 | yes |
| 91701 | 261900 | 211909 | 8989/89891 | yes |
(B) For locomotives of type BR 103, BR 151 and Ae 6/6 produced after mid-2002, you will need 211903 instead. Unfortunately, there is no easy way to differentiate the two versions of these models. Instead, make an educated guess: if your engine is brand-new, order the newer motor (211903); otherwise, purchase the older motor (211901). If you're not sure, purchase both motors and sell the one that doesn't fit on eBay. Please let me know if you have more information on this issue.
(C) Reportedly, upgrading the motor on an 8899/88991 locomotive is quite a hassle. Chet says, "You actually have to unsolder the capacitor and after installing the new motor solder back again."
Alternatives
Replacing an old Marklin motor with a new Marklin motor isn't the only way to improve the performance of a Marklin locomotive. Here are some alternative solutions:
 A number of years ago, I purchased a pair of Marklin F7s on eBay that featured Faulhaber coreless motors (the same ones used by some American Z Lines brass engines) in place of the Marklin units.
I swapped them for the two powered chassis in this A-B-A set, and it runs quite nicely.
Unfortunately, slow-speed performance isn't nearly as good as Marklin's own 5-pole, but the set is considerably quieter than the stock version.
A number of years ago, I purchased a pair of Marklin F7s on eBay that featured Faulhaber coreless motors (the same ones used by some American Z Lines brass engines) in place of the Marklin units.
I swapped them for the two powered chassis in this A-B-A set, and it runs quite nicely.
Unfortunately, slow-speed performance isn't nearly as good as Marklin's own 5-pole, but the set is considerably quieter than the stock version.
The conversion appears to have required installing flywheels and cutting away some of the frame. Alas, I don't know who did the conversion, or where to get the necessary parts. (If anyone does have a reliable source, please let me know - thanks!
Return Home | Search | Contact Me
Copyright © 2000-2010 D. A. Karp. All rights reserved.