Improving Locomotive Traction
After seeing a real-life locomotive pull more than 100 plus cars before our eyes, it's hard not to be disappointed when a Z-scale locomotive has trouble pulling ten cars on level track. However, we Z-scalers have a lot more in common with our real-life counterparts than you might expect. Locomotive designers and train operators alike have had to come up with all sorts of ways get their engines to pull more freight. In the days of steam, it wasn't unheard of to sprinkle sand on the rails to increase the adhesion of the wheels. (Don't try this with Z!)
The biggest hurdle our little Z-scale locomotives must overcome is their light weight, although there are several ways to increase their tractive effort other than simply making them heavier. The following topics should help you improve the tractive effort of nearly any Z-scale locomotive.
In this article:
See also:
Feel free to write me if you have any additions or corrections to this page. Click on any photo to see more detail.
Measuring Tractive Effort
Tractive effort is the force that a locomotive is capable of exerting, though its coupler, to pull a train. The coefficient of static friction (and kinetic friction, if the wheels are spinning), the weight of the engine, the contact surface area of the driving wheels on the rails, and the power the locomotive can produce are all factors of the tractive effort. Likewise, curves, grades, and the weight and rolling resistance of the freight all increase an the tractive effort required to move a train.
Now, the most obvious test of tractive effort is to see how many cars a locomotive can pull on your layout. However, since the weight of cars, the number of wheels, the curvature and steepness of the track, and the dirt on the rails are all factors, this is not the most reliable and repeatable gauge.
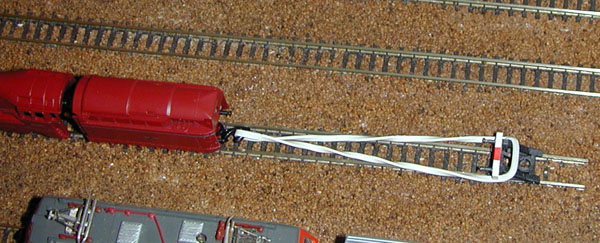 An easier, less subjective test can be performed by simply hooking your engine up to a soft rubber band or very soft extension spring.
It won't make any difference to the locomotive; all it "sees" is the force pulling on its coupler.
An easier, less subjective test can be performed by simply hooking your engine up to a soft rubber band or very soft extension spring.
It won't make any difference to the locomotive; all it "sees" is the force pulling on its coupler.
One end of the spring/rubber band should be fixed to a stationary object, like the track bumper in this photo, and the other end should be attached the locomotive's coupler (either a Marklin or Micro-Trains coupler should work). Move the engine until just before the spring/rubber band is extended; it should be applying no force to the locomotive (yet). Start by applying power very slowly - the engine will start to deflect the spring/rubber brand until the wheels begin to spin. Mark the position furthest from the stationary object the locomotive is able to move.
Once the wheels start spinning, you'll notice the locomotive bounce backwards somewhat. This is caused by the fact that the coefficient of static friction is higher than the coefficient of kinetic friction; in lay terms, there's more friction when there's no wheel slippage.
You can use this method to compare different locomotives, or even to test the effectiveness of the solutions on this page (or any others you've come up with).
Using Multiple Locomotives
If one locomotive can pull eight cars, two locomotives should be able to pull sixteen cars, right? Under ideal conditions, this actually turns out to be true. In fact, "double-headers" (two units), "triple-headers" (three units), and even more are commonly seen in real trains and model railroads alike for just that reason.
Here are some tips on getting the most from more than one locomotive:
Adding Weight
There are no two ways about it - heavier locomotives can pull more cars. Given the small size of Z-scale locomotives, however, it's often very difficult to make them heavy enough.
The little motors (both the three and five-pole varieties) installed in Marklin units are easily capable of moving heavier engines. However, Marklin continues to make their engines too light; the average weight of a Marklin F7 diesel is about 0.75 oz (21 g). Some Marklin models are heavier, though - the Marklin 88861 pictured here weighs about 1.5 oz (43 g) without its tender, thanks to its cast metal shell.
At 2.25 oz (64 g), the heavier Micro-Trains F7s are designed to pull a lot of cars; their light-weight cars make things even better. The heaviest engines I've tested, though, have been the all-brass locomotives by American Z Lines; weighing in at 2.75 oz (78 g) (for the C44-9W and PA-1), they're terrific pullers.
 Luckily, it may be possible to add weight to the locomotives you've already got.
The biggest hurdle, though, is the limited space in our little Z-scale engines.
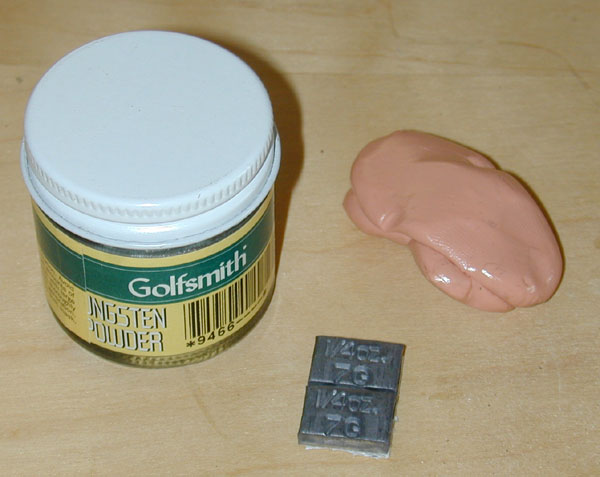
The solution is density - the denser the material, the less space it needs to make a difference.
Luckily, it may be possible to add weight to the locomotives you've already got.
The biggest hurdle, though, is the limited space in our little Z-scale engines.
The solution is density - the denser the material, the less space it needs to make a difference.
|
Warning Both lead and tungsten are pretty nasty materials that can cause all sorts of health problems if you're not careful. Make sure to wash your hands after working with lead (or wear latex gloves), especially before eating (nail-biters beware). Use tungsten powder only in a well-ventilated area; it's best to wear an NIOSH-approved, N95-compliant face mask, too. |
Note that both lead and tungsten conduct electricity (and tungsten is ignitable), so you'll want to make sure to electrically insulate any weight you add, especially if it's near the motor or circuit board.
 The next step is to find space in your locomotive for the weight, and you'll find some engines to be more accommodating than others.
For example, this photo shows two Marklin 8860 locomotives, one with its shell removed.
Here, you can see the amount of wasted space between the top of the chassis and the ceiling of the shell, especially at the rear.
The next step is to find space in your locomotive for the weight, and you'll find some engines to be more accommodating than others.
For example, this photo shows two Marklin 8860 locomotives, one with its shell removed.
Here, you can see the amount of wasted space between the top of the chassis and the ceiling of the shell, especially at the rear.
Steam engines will provide more of a challenge because of the nearly non-existent amount of free space.
However, the portion of the chassis that fits inside of the boiler (in the shell) likely has some free space where a little tungsten powder can be tucked.
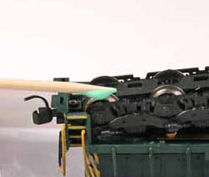
 Before you add weight to any locomotive, try jamming some Silly Putty in there first.
It won't harm your locomotive, it doesn't conduct electricity (and won't cause a short), and when you put the shell on the chassis, it will push the Silly Putty around.
This way, you can determine exactly how much space you have to play with.
Watch out for lights, windows, and pantograph contacts in electric locomotives; use an X-acto knife to trim away any excess.
Before you add weight to any locomotive, try jamming some Silly Putty in there first.
It won't harm your locomotive, it doesn't conduct electricity (and won't cause a short), and when you put the shell on the chassis, it will push the Silly Putty around.
This way, you can determine exactly how much space you have to play with.
Watch out for lights, windows, and pantograph contacts in electric locomotives; use an X-acto knife to trim away any excess.
You may wish to test any of these methods on the inside of a lowly boxcar first; you won't be risking your locomotive shell or mechanism, but it's the same plastic, and should allow you to more accurately predict the results.
Note that any weights fixed with white glue can be loosened with a small amount of water and a large amount of patience.
Lightening the Load
 Naturally, a locomotive can pull more cars if those cars weigh less.
Cars are typically weighted carefully at the factory; too light, and they'll derail easily - too heavy, and no engine will be able to pull them.
However, depending on your rolling stock and your layout, you may be able to lighten some of your cars.
Naturally, a locomotive can pull more cars if those cars weigh less.
Cars are typically weighted carefully at the factory; too light, and they'll derail easily - too heavy, and no engine will be able to pull them.
However, depending on your rolling stock and your layout, you may be able to lighten some of your cars.
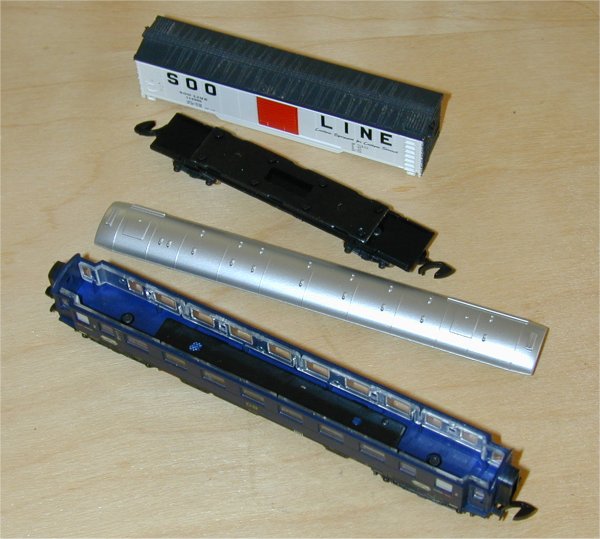
Marklin 50-foot boxcars (American) and Micro-Trains 50-foot boxcars both weigh the same; about 1/3 oz (9.5 g). However, only Marklin cars have removable weights; Micro-Trains units get their weight from their metal chassis. Marklin passenger cars all have removable weights, but tank cars and gondolas (both Marklin and Micro-Trains) do not.
In this photo, you'll see that the metal weights are held to the plastic frame with two plastic "welds" (plastic pins melted against the metal). To remove the weight, simply trim the plastic welds with an X-acto knife, and pull them off - reattach by remelting the plastic with a soldering iron, or by using a small dab of glue.
The weights in PennZee hoppers are metal rods fixed to the inside of the chassis with glue. To remove them, pop out the coal loads (details here), and cut away the glue with an X-acto knife.
After removing the weights, the cars will be lightened by about 25%-40%, which means you'll be able to pull 20%-50% more of them with the same motive power. Watch them around tight curves and especially across turnouts, but in many cases, the lighter weight won't cause a problem; if it does, try placing the heavier cars closer to the front of the train. Naturally, some experimentation is encouraged.
|
NMRA Standards The National Model Railroad Association's recommended car weight guide is a great resource for calculating the optimal weight of most types of cars. (See also the NMRA RP-20.1 Car Weight standard.) Although they don't specifically mention Z scale (no surprise there), you can extrapolate by multiplying the recommended N scale weights by roughly 40%.(That's Z/N cubed, or (160/220)3 = 0.384) So, according to NMRA standards, a Z scale car should weigh 0.20 oz plus 0.06 oz per inch (or 5.70 g plus 0.70 g per centimeter), which is just about what most Z-scale cars weigh out of the box. |
Additional Solutions
Here are some additional tips that will help you get more tractive effort out of your Z-scale locomotives:
 Bullfrog Snot (yes, that's actually the name of the product) is basically green slime you "paint" onto a pair of your locomotive's driving wheels, like this.
Since it's a liquid, it'll work with any size wheel, and can be easily reapplied if it runs out.
Here are installation instructions (courtesy of Zscale Monster Trains), Frequently Asked Questions, and some Testimonials.
Bullfrog Snot (yes, that's actually the name of the product) is basically green slime you "paint" onto a pair of your locomotive's driving wheels, like this.
Since it's a liquid, it'll work with any size wheel, and can be easily reapplied if it runs out.
Here are installation instructions (courtesy of Zscale Monster Trains), Frequently Asked Questions, and some Testimonials.
Return Home | Search | Contact Me
Copyright © 2000-2010 D. A. Karp. All rights reserved.